说明和准备工作 在使用 LangChain 或 LlamaIndex 这类线性框架时,一旦涉及死循环重试、多分支决策或人机协同(Human-in-the-Loop),代码往往极易沦为难以维护的 “意大利面条”。LangGraph4j 作为 Java 生态中唯一的 LangGraph 优秀移植版,凭借有向有环图(DAG / Cyclic Graph)架构,正是为优雅化解这些工程痛点而生。
本文将通过实际案例,系统拆解 LangGraph4j 的核心机制:从条件分支与循环控制、 状态管理与断点续传,到多 Agent 协作与任务并行化,再到主图与子图的模块化设计。我们将通过一系列具体案例,演示如何利用这些特性构建健壮的 Agent。
依赖配置:父项目配置,请参考本站 Langchain4j - 基础工程的构建以及两套API测试案例 - 父项目-POM 。
1 2 3 4 5 6 7 8 9 10 11 12 13 14 15 16 17 18 19 20 21 22 23 24 25 26 27 28 29 30 31 32 33 34 35 36 37 38 39 40 41 42 43 44 45 46 47 48 <dependencies > <dependency > <groupId > org.springframework.boot</groupId > <artifactId > spring-boot-starter-web</artifactId > </dependency > <dependency > <groupId > com.mysql</groupId > <artifactId > mysql-connector-j</artifactId > <scope > runtime</scope > </dependency > <dependency > <groupId > com.zaxxer</groupId > <artifactId > HikariCP</artifactId > </dependency > <dependency > <groupId > org.springframework.boot</groupId > <artifactId > spring-boot-starter-jdbc</artifactId > </dependency > <dependency > <groupId > org.bsc.langgraph4j</groupId > <artifactId > langgraph4j-core</artifactId > </dependency > <dependency > <groupId > org.bsc.langgraph4j</groupId > <artifactId > langgraph4j-mysql-saver</artifactId > </dependency > <dependency > <groupId > org.projectlombok</groupId > <artifactId > lombok</artifactId > <optional > true</optional > </dependency > </dependencies > <build > <plugins > <plugin > <groupId > org.springframework.boot</groupId > <artifactId > spring-boot-maven-plugin</artifactId > </plugin > </plugins > </build >
配置文件:
1
2
3
4
5
6
7
8
9
10
11
spring: datasource: url: jdbc:mysql://192.168.1.251:3306/colibri_db?useUnicode=true&characterEncoding=utf8&zeroDateTimeBehavior=convertToNull&useSSL=true&serverTimezone=GMT%2B8 username: xxx password: xxx driver-class-name: com.mysql.cj.jdbc.Driver hikari: maximum-pool-size: 10 minimum-idle: 5 idle-timeout: 30000 connection-timeout: 20000
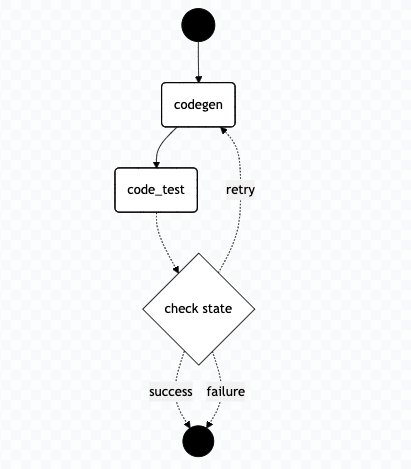
条件分支和循环案例 在这个案例中,我们将实现一个具有代码审查和自纠错能力的智能 Agent:
codegen 节点:根据用户需求,生成初始 Java 代码。
code_test 节点:对代码进行编译/测试(模拟运行),若发现报错则将错误信息追加到 State。
decide_next 条件路由:
如果测试通过,直接路由到 END。
如果测试失败,且重试次数未达到上限(本例设为 3 次),则循环返回 codegen 节点(携带上一次的报错,进行自纠错)。
如果重试次数达到上限,直接路由到 END 抛出最终失败。
声明共享状态 1 2 3 4 5 6 7 8 9 10 11 12 13 14 15 16 17 18 19 20 21 22 23 24 25 26 27 28 29 30 31 32 33 34 35 36 37 public class CodeCorrectionState extends AgentState { public static final String REQUIREMENT_KEY = "requirement" ; public static final String CODE_KEY = "code" ; public static final String ERROR_KEY = "error" ; public static final String RETRY_COUNT_KEY = "retry_count" ; public static final Map<String, Channel<?>> SCHEMA = CollectionsUtils.mapOf( REQUIREMENT_KEY, Channels.base(() -> "" ), CODE_KEY, Channels.base(() -> "" ), ERROR_KEY, Channels.base(() -> "" ), RETRY_COUNT_KEY, Channels.base(() -> 0 ) ); public CodeCorrectionState (Map<String, Object> initData) { super (initData); } public String requirement () { return this .<String>value(REQUIREMENT_KEY).orElse("" ); } public String code () { return this .<String>value(CODE_KEY).orElse("" ); } public Optional<String> error () { return this .value(ERROR_KEY); } public int retryCount () { return this .<Integer>value(RETRY_COUNT_KEY).orElse(0 ); } }
编写节点动作 CodeGenNode:
1 2 3 4 5 6 7 8 9 10 11 12 13 14 15 16 17 18 19 20 21 22 23 24 25 26 27 28 29 30 31 32 33 34 35 36 37 38 39 40 41 42 43 import org.bsc.langgraph4j.action.NodeAction;import org.bsc.langgraph4j.utils.CollectionsUtils;import org.springframework.stereotype.Component;import java.util.Map;@Component public class CodeGenNode implements NodeAction <CodeCorrectionState> { @Override public Map<String, Object> apply (CodeCorrectionState state) { String requirement = state.requirement(); String currentCode = state.code(); String error = state.error().orElse("" ); System.out.printf("[Node: codegen] 正在针对需求 [%s] 编写代码... 当前重试轮次: %d\n" , requirement, state.retryCount()); String generatedCode; if (error.isEmpty()) { generatedCode = "public class Solution {\n" + " public int add(int a, int b) {\n" + " return a - b; // 👉🏻 故意写错成减法,触发后续测试报错\n" + " }\n" + "}" ; } else { System.out.println("[Node: codegen] 👉🏻 检测到上次执行报错,大模型正在自愈修复代码..." ); generatedCode = "public class Solution {\n" + " public int add(int a, int b) {\n" + " return a + b; // 修正为加法\n" + " }\n" + "}" ; } return CollectionsUtils.mapOf(CodeCorrectionState.CODE_KEY, generatedCode); } }
CodeTestNode:
1 2 3 4 5 6 7 8 9 10 11 12 13 14 15 16 17 18 19 20 21 22 23 24 25 26 27 28 @Component public class CodeTestNode implements NodeAction <CodeCorrectionState> { @Override public Map<String, Object> apply (CodeCorrectionState state) { String code = state.code(); System.out.println("[Node: code_test] 正在运行单元测试评估代码..." ); if (code.contains("return a - b;" )) { System.out.println("[Node: code_test] 测试未通过!预期 add(1, 1) = 2, 实际返回 0" ); return CollectionsUtils.mapOf( CodeCorrectionState.ERROR_KEY, "Test failed: Assertion failed! Expected 2 but got 0" , CodeCorrectionState.RETRY_COUNT_KEY, state.retryCount() + 1 ); } else { System.out.println("[Node: code_test] 测试通过!100% Pass." ); return CollectionsUtils.mapOf( CodeCorrectionState.ERROR_KEY, "" , CodeCorrectionState.RETRY_COUNT_KEY, state.retryCount() ); } } }
编写工作流图 CodeCorrectionGraphConfig:
1 2 3 4 5 6 7 8 9 10 11 12 13 14 15 16 17 18 19 20 21 22 23 24 25 26 27 28 29 30 31 32 33 34 35 36 37 38 39 40 41 42 43 44 45 46 47 48 49 50 51 52 53 54 55 56 57 58 59 60 import org.bsc.langgraph4j.*;import org.bsc.langgraph4j.action.AsyncEdgeAction;import org.bsc.langgraph4j.action.AsyncNodeAction;import org.bsc.langgraph4j.utils.CollectionsUtils;import org.springframework.context.annotation.Bean;import org.springframework.context.annotation.Configuration;@Configuration public class CodeCorrectionGraphConfig { private final CodeGenNode codeGenNode; private final CodeTestNode codeTestNode; public CodeCorrectionGraphConfig (CodeGenNode codeGenNode, CodeTestNode codeTestNode) { this .codeGenNode = codeGenNode; this .codeTestNode = codeTestNode; } @Bean public CompiledGraph<CodeCorrectionState> codeCorrectionGraph () throws GraphStateException { CompiledGraph<CodeCorrectionState> compiledGraph = new StateGraph <>(CodeCorrectionState.SCHEMA, CodeCorrectionState::new ) .addNode("codegen" , AsyncNodeAction.node_async(codeGenNode)) .addNode("code_test" , AsyncNodeAction.node_async(codeTestNode)) .addEdge(GraphDefinition.START, "codegen" ) .addEdge("codegen" , "code_test" ) .addConditionalEdges( "code_test" , AsyncEdgeAction.edge_async(state -> { String error = state.error().orElse("" ); int retries = state.retryCount(); if (error.isEmpty()) { return "success" ; } if (retries < 3 ) { return "retry" ; } return "failure" ; }), CollectionsUtils.mapOf( "success" , GraphDefinition.END, "retry" , "codegen" , "failure" , GraphDefinition.END ) ) .compile(); System.out.println("\nCodeCorrectionGraph:: " + compiledGraph.getGraph(GraphRepresentation.Type.MERMAID) + "\n" ); return compiledGraph; } }
编写测试入口 最后,我们通过一个 CommandLineRunner 来运行这个工作流,并观察控制台打印出来的状态推进与循环演进:
1 2 3 4 5 6 7 8 9 10 11 12 13 14 15 16 17 18 19 20 21 22 23 24 25 26 27 28 29 30 31 32 33 34 35 36 37 38 39 40 41 42 43 44 45 46 47 48 49 50 51 52 import org.bsc.langgraph4j.CompiledGraph;import org.bsc.langgraph4j.utils.CollectionsUtils;import org.springframework.boot.CommandLineRunner;import org.springframework.stereotype.Component;import java.util.Map;@Component public class GraphRunner implements CommandLineRunner { private final CompiledGraph<CodeCorrectionState> codeCorrectionGraph; public GraphRunner (CompiledGraph<CodeCorrectionState> codeCorrectionGraph) { this .codeCorrectionGraph = codeCorrectionGraph; } @Override public void run (String... args) throws Exception { System.out.println("\n===== 启动大模型代码纠错 Agent 流程 =====" ); Map<String, Object> inputs = CollectionsUtils.mapOf( CodeCorrectionState.REQUIREMENT_KEY, "写一个两个数相加的方法" ); CodeCorrectionState finalState = codeCorrectionGraph.invoke(inputs).get(); System.out.println("\n===== 工作流执行完毕 =====" ); System.out.println("最终重试次数: " + finalState.retryCount()); System.out.println("最终生成的代码:\n" + finalState.code()); if (finalState.error().isPresent() && !finalState.error().get().isEmpty()) { System.out.println("最终错误信息: " + finalState.error().get()); } else { System.out.println("纠错结果: 代码已完美修复并成功上线!" ); } } }
运行该 Spring Boot 项目后,在控制台中清晰地观察到图在执行期间的流转:
1 2 3 4 5 6 7 8 9 10 11 12 13 14 15 16 17 18 ===== 启动大模型代码纠错 Agent 流程 ===== [Node: codegen] 正在针对需求 [写一个两个数相加的方法] 编写代码... 当前重试轮次: 0 [Node: code_test] 正在运行单元测试评估代码... [Node: code_test] 测试未通过!预期 add(1, 1) = 2, 实际返回 0 [Node: codegen] 正在针对需求 [写一个两个数相加的方法] 编写代码... 当前重试轮次: 1 [Node: codegen] 👉🏻 检测到上次执行报错,大模型正在自愈修复代码... [Node: code_test] 正在运行单元测试评估代码... [Node: code_test] 测试通过!100% Pass. ===== 工作流执行完毕 ===== 最终重试次数: 1 最终生成的代码: public class Solution { public int add(int a, int b) { return a + b; // 修正为加法 } } 纠错结果: 代码已完美修复并成功上线!
第一次循环:codegen 故意编写了返回 a - b 的错代码。code_test 判定失败并将 retry_count 递增为 1。decide_next 检测到计数器小于 3 重新指向了 codegen 节点。
第二次循环:codegen 读取到了 State 里的错误详情,输出纠错后的 a + b,code_test 判定通过返回空 Error。最后,控制路由成功走向 END。
测试中有一个小坑需要注意:在 Java 中,System.out(标准输出 - stdout)和 System.err(标准错误输出 - stderr)其实是两条不同的通道,它们在 JVM 乃至操作系统底层是完全独立和异步缓冲的。System.out 有缓冲(Buffered),System.err 没有缓冲。LangGraph4j 本质上是基于 CompletableFuture 驱动的多线程异步图引擎,如果程序中出现了本该按 System.err、System.out 顺序打印,而实际先打印了System.out,那么大概率就是标准输出和错误输出混用的原因。实际测试中,还是推荐使用标准的 SLF4J 日志,日志框架内部会保证同一个线程、甚至跨线程日志在队列里的时间戳顺序性。
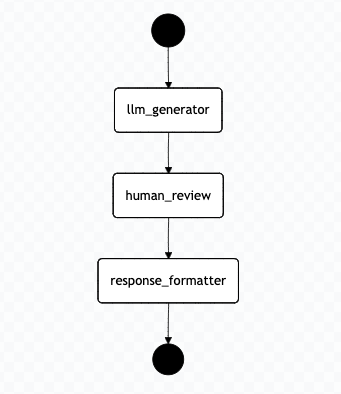
人机协同实现案例 这个案例将展示如何配置断点挂起流程,并通过 API 传入人工审批结果,精准从 MySQL 中唤醒并恢复 LangGraph 流程。该类型的案例也可以参考本站之前的 《Langgraph4j - 基础介绍和案例演示(一) - 检查点挂起与人工审核》 。
声明共享状态 1 2 3 4 5 6 7 8 9 10 11 12 13 14 15 16 17 18 19 20 21 22 23 24 25 26 27 28 29 30 31 32 public class ReviewState extends AgentState { public static final String QUERY_KEY = "query" ; public static final String AGENT_RESPONSE_KEY = "agentResponse" ; public static final String IS_SAFE_KEY = "isSafe" ; public static final Map<String, Channel<?>> SCHEMA = mapOf( QUERY_KEY, Channels.base(() -> "" ), AGENT_RESPONSE_KEY, Channels.base(() -> "" ), IS_SAFE_KEY, Channels.base(() -> false ) ); public ReviewState (Map<String, Object> initData) { super (initData); } public String query () { return this .<String>value(QUERY_KEY).orElse("" ); } public String agentResponse () { return this .<String>value(AGENT_RESPONSE_KEY).orElse("" ); } public boolean isSafe () { return this .<Boolean>value(IS_SAFE_KEY).orElse(false ); } }
编写工作流图 1 2 3 4 5 6 7 8 9 10 11 12 13 14 15 16 17 18 19 20 21 22 23 24 25 26 27 28 29 30 31 32 33 34 35 36 37 38 39 40 41 42 43 44 45 46 47 48 49 50 51 52 53 54 import static org.bsc.langgraph4j.GraphDefinition.END;import static org.bsc.langgraph4j.GraphDefinition.START;import static org.bsc.langgraph4j.action.AsyncNodeAction.node_async;import static org.bsc.langgraph4j.utils.CollectionsUtils.mapOf;@Configuration public class ReviewGraphConfig { @Bean(name = "mysqlSaver") public MysqlSaver mysqlSaver (DataSource dataSource) { return new MysqlSaver .Builder().dataSource(dataSource).build(); } @Bean public CompiledGraph<ReviewState> reviewGraph (MysqlSaver mysqlSaver) throws GraphStateException { StateGraph<ReviewState> graph = new StateGraph <>(ReviewState.SCHEMA, ReviewState::new ); CompiledGraph<ReviewState> compiledGraph = graph .addNode("llm_generator" , node_async(state -> { System.out.println("[Node: llm_generator] 大模型正在生成敏感回答..." ); return mapOf(ReviewState.AGENT_RESPONSE_KEY, "这是一条需要管理员审核的敏感 AI 话术。" ); })) .addNode("human_review" , node_async(state -> { System.out.println("[Node: human_review] 流程已进入人工审核关卡..." ); return Map.of(); })) .addNode("response_formatter" , node_async(state -> { System.out.println("[Node: response_formatter] 正在封装最终安全数据..." ); String finalOutput = state.isSafe() ? state.agentResponse() : "⚠️ 内容涉嫌违规,已被拦截!" ; return mapOf(ReviewState.AGENT_RESPONSE_KEY, "[安全加密输出] " + finalOutput); })) .addEdge(START, "llm_generator" ) .addEdge("llm_generator" , "human_review" ) .addEdge("human_review" , "response_formatter" ) .addEdge("response_formatter" , END) .compile( CompileConfig.builder() .checkpointSaver(mysqlSaver) .interruptBefore("human_review" ) .build() ); System.out.println("\HumanReviewGraph:: " + compiledGraph.getGraph(GraphRepresentation.Type.MERMAID) + "\n" ); return compiledGraph; } }
服务层和测试入口 服务层主要处理两个核心逻辑:
启动工作流:将状态存入 MySQL,触发断点自动挂起。
人工审批唤醒:读取快照,注入审批数据,发出 resume 信号复活流程。
1 2 3 4 5 6 7 8 9 10 11 12 13 14 15 16 17 18 19 20 21 22 23 24 25 26 27 28 29 30 31 32 33 34 35 36 37 38 39 40 41 42 43 44 45 46 47 48 49 50 51 52 53 54 55 56 57 58 59 60 61 62 63 64 65 66 67 68 69 70 71 72 73 74 75 76 77 78 79 80 81 82 83 84 85 86 87 88 89 90 91 92 93 import lombok.extern.slf4j.Slf4j;import org.bsc.langgraph4j.CompiledGraph;import org.bsc.langgraph4j.GraphInput;import org.bsc.langgraph4j.RunnableConfig;import org.bsc.langgraph4j.state.StateSnapshot;import org.springframework.stereotype.Service;import java.util.Map;import java.util.Optional;import static org.bsc.langgraph4j.utils.CollectionsUtils.mapOf;@Slf4j @Service public class AgentWorkflowService { private final CompiledGraph<ReviewState> reviewGraph; public AgentWorkflowService (CompiledGraph<ReviewState> reviewGraph) { this .reviewGraph = reviewGraph; } public String startWorkflow (String threadId, String query) throws Exception { log.info("=== 🚀 开始执行工作流, ThreadId: {} ===" , threadId); RunnableConfig config = RunnableConfig.builder() .threadId(threadId) .build(); Map<String, Object> inputs = mapOf(ReviewState.QUERY_KEY, query); reviewGraph.stream(inputs, config).forEach(chunk -> { log.info("正在流转节点: {}" , chunk.node()); }); Optional<StateSnapshot<ReviewState>> stateSnapshot = Optional.ofNullable(reviewGraph.getState(config)); if (stateSnapshot.isPresent()) { StateSnapshot<ReviewState> snapshot = stateSnapshot.get(); log.info("当前图执行状态: Next Node = {}" , snapshot.next()); if (snapshot.next().contains("human_review" )) { log.warn("🚨 工作流检测到敏感数据,已被成功拦截并保存至 MySQL。等待管理员审批!" ); return "SUSPENDED" ; } } return "COMPLETED" ; } public String reviewAndResume (String threadId, boolean isApproved, String modifiedResponse) throws Exception { log.info("=== 🚦 接收到审批请求, ThreadId: {}, 审批结果: {} ===" , threadId, isApproved); RunnableConfig config = RunnableConfig.builder() .threadId(threadId) .build(); StateSnapshot<ReviewState> snapshot = reviewGraph.getState(config); Optional<StateSnapshot<ReviewState>> snapshotOpt = reviewGraph.stateOf(config); if (snapshotOpt.isEmpty()) { throw new IllegalStateException ("未找到对应的会话状态!" ); } if (!snapshot.next().contains("human_review" )) { throw new IllegalStateException ("当前会话不处于人工审核挂起状态!可能已经执行完毕。" ); } Map<String, Object> updateValues = mapOf( ReviewState.IS_SAFE_KEY, isApproved, ReviewState.AGENT_RESPONSE_KEY, modifiedResponse ); reviewGraph.updateState(config, updateValues); log.info("✔ 已通过 updateState 将洗白数据注入 MySQL 快照中" ); log.info("🔄 正在从 MySQL 数据库恢复并激活图流转..." ); reviewGraph.stream(GraphInput.resume(), config).forEach(chunk -> { log.info("恢复流转中,经过节点: {}" , chunk.node()); }); StateSnapshot<ReviewState> stateSnapshot = reviewGraph.getState(config); ReviewState finalState = stateSnapshot.state(); log.info("🎉 图流程彻底结束。最终输出: {}" , finalState.agentResponse()); return finalState.agentResponse(); } }
AgentWorkflowController:
1 2 3 4 5 6 7 8 9 10 11 12 13 14 15 16 17 18 19 20 21 22 23 24 25 26 27 28 29 30 31 32 33 34 35 36 37 38 39 40 41 42 43 44 45 46 47 48 @RestController @RequestMapping("/api/agent") @RequiredArgsConstructor public class AgentWorkflowController { @Resource private AgentWorkflowService workflowService; @GetMapping("/ask") public ResponseEntity<Map<String, Object>> ask (@RequestParam String threadId, @RequestParam String query) { try { String status = workflowService.startWorkflow(threadId, query); return ResponseEntity.ok(Map.of( "threadId" , threadId, "status" , status, "message" , "SUSPENDED" .equals(status) ? "内容涉嫌敏感,已送交人工审核。" : "执行成功" )); } catch (Exception e) { return ResponseEntity.internalServerError().body(Map.of("error" , e.getMessage())); } } @GetMapping("/review") public ResponseEntity<Map<String, Object>> review (@RequestParam String threadId, @RequestParam Boolean approved, @RequestParam String modifiedResponse) { try { String finalResult = workflowService.reviewAndResume( threadId, approved, modifiedResponse ); return ResponseEntity.ok(Map.of( "threadId" , threadId, "status" , "SUCCESS" , "finalOutput" , finalResult )); } catch (Exception e) { return ResponseEntity.badRequest().body(Map.of("error" , e.getMessage())); } } }
请求和日志:
1
2
3
4
5
6
7
8
9
10
11
12
13
14
15
16
17
18
19
20
$ curl http://localhost:8080/api/agent/ask?threadId=2&query=请帮我写一段针对某公司的评估小作文 [http-nio-8080-exec-5] INFO d.human_review.AgentWorkflowService - === 🚀 开始执行工作流, ThreadId: 2 === [http-nio-8080-exec-5] INFO d.human_review.AgentWorkflowService - 正在流转节点: __START__ [Node: llm_generator] 大模型正在生成敏感回答... [http-nio-8080-exec-5] INFO d.human_review.AgentWorkflowService - 正在流转节点: llm_generator [http-nio-8080-exec-5] INFO d.human_review.AgentWorkflowService - 当前图执行状态: Next Node = human_review [http-nio-8080-exec-5] WARN d.human_review.AgentWorkflowService - 🚨 工作流检测到敏感数据,已被成功拦截并保存至 MySQL。等待管理员审批! $ curl http://localhost:8080/api/agent/review?threadId=2&approved=true &modifiedResponse=符合市场预期 [http-nio-8080-exec-9] INFO d.human_review.AgentWorkflowService - === 🚦 接收到审批请求, ThreadId: 2, 审批结果: true === [http-nio-8080-exec-9] INFO d.human_review.AgentWorkflowService - ✔ 已通过 updateState 将洗白数据注入 MySQL 快照中 [http-nio-8080-exec-9] INFO d.human_review.AgentWorkflowService - 🔄 正在从 MySQL 数据库恢复并激活图流转... [Node: human_review] 流程已进入人工审核关卡... [http-nio-8080-exec-9] INFO d.human_review.AgentWorkflowService - 恢复流转中,经过节点: human_review [Node: response_formatter] 正在封装最终安全数据... [http-nio-8080-exec-9] INFO d.human_review.AgentWorkflowService - 恢复流转中,经过节点: response_formatter [http-nio-8080-exec-9] INFO d.human_review.AgentWorkflowService - 恢复流转中,经过节点: __END__ [http-nio-8080-exec-9] INFO d.human_review.AgentWorkflowService - 🎉 图流程彻底结束。最终输出: [安全加密输出] 符合市场预期
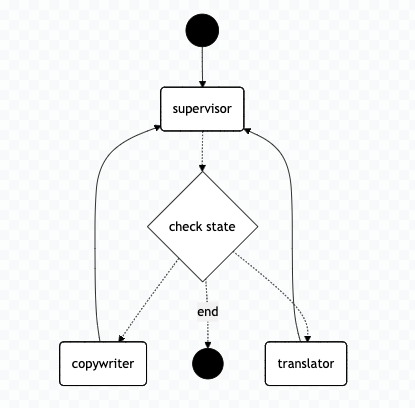
多 Agent 协作案例 提供一个多 Agent 协作的代码骨架,展示主管 Agent 如何解析任务,分发给不同的专家 Agent(如文案、翻译),并最终在 State 中合并结果。
声明共享状态 1 2 3 4 5 6 7 8 9 10 11 12 13 14 15 16 17 18 19 20 21 22 23 24 25 26 27 28 29 30 31 32 33 34 35 36 37 38 39 40 41 42 43 44 45 46 47 48 49 50 51 52 53 54 55 56 import org.bsc.langgraph4j.state.AgentState;import org.bsc.langgraph4j.state.Channel;import org.bsc.langgraph4j.state.Channels;import java.util.Map;import static org.bsc.langgraph4j.utils.CollectionsUtils.mapOf;public class CollaborationState extends AgentState { public static final String USER_INPUT = "userInput" ; public static final String NEXT_AGENT = "nextAgent" ; public static final String COPYWRITING_RESULT = "copywritingResult" ; public static final String TRANSLATION_RESULT = "translationResult" ; public static final String IS_FINISHED = "isFinished" ; public static final Map<String, Channel<?>> SCHEMA = mapOf( USER_INPUT, Channels.base(() -> "" ), NEXT_AGENT, Channels.base(() -> "SUPERVISOR" ), COPYWRITING_RESULT, Channels.base(() -> "" ), TRANSLATION_RESULT, Channels.base(() -> "" ), IS_FINISHED, Channels.base(() -> false ) ); public CollaborationState (Map<String, Object> initData) { super (initData); } public String getUserInput () { return this .<String>value(USER_INPUT).orElse("" ); } public String getNextAgent () { return this .<String>value(NEXT_AGENT).orElse("SUPERVISOR" ); } public String getCopywritingResult () { return this .<String>value(COPYWRITING_RESULT).orElse("" ); } public String getTranslationResult () { return this .<String>value(TRANSLATION_RESULT).orElse("" ); } public boolean isFinished () { return this .<Boolean>value(IS_FINISHED).orElse(false ); } }
编写节点动作 1 2 3 4 5 6 7 8 9 10 11 12 13 14 15 16 17 18 19 20 21 22 23 24 25 26 27 28 29 30 31 32 33 34 35 36 37 38 39 40 41 42 43 44 45 46 47 48 49 50 51 52 53 54 55 56 57 58 59 60 61 62 63 64 65 66 67 68 69 70 71 72 73 74 75 76 77 78 79 80 81 82 83 84 85 86 87 88 89 90 91 92 93 import lombok.extern.slf4j.Slf4j;import org.bsc.langgraph4j.action.AsyncNodeAction;import static org.bsc.langgraph4j.action.AsyncNodeAction.node_async;import static org.bsc.langgraph4j.utils.CollectionsUtils.mapOf;@Slf4j public class AgentNodes { public static AsyncNodeAction<CollaborationState> supervisorNode () { return node_async(state -> { String input = state.getUserInput().toLowerCase(); log.info("[Supervisor] 正在解析任务。当前状态:文案已完成[{}], 翻译已完成[{}]" , !state.getCopywritingResult().isEmpty(), !state.getTranslationResult().isEmpty()); if (input.contains("写" ) || input.contains("文案" )) { if (state.getCopywritingResult().isEmpty()) { log.info("[Supervisor] 🎯 决策:分发给【文案专家】" ); return mapOf(CollaborationState.NEXT_AGENT, "COPYWRITER" ); } } if (input.contains("译" ) || input.contains("翻译" ) || input.contains("英文" )) { if ((input.contains("写" ) || input.contains("文案" )) && state.getCopywritingResult().isEmpty()) { log.info("[Supervisor] ⏳ 决策:虽然要翻译,但文案尚未生成,先派发给【文案专家】" ); return mapOf(CollaborationState.NEXT_AGENT, "COPYWRITER" ); } if (state.getTranslationResult().isEmpty()) { log.info("[Supervisor] 🎯 决策:分发给【翻译专家】" ); return mapOf(CollaborationState.NEXT_AGENT, "TRANSLATOR" ); } } log.info("[Supervisor] 🏁 决策:所有指派任务已完成,准备收工。" ); return mapOf( CollaborationState.NEXT_AGENT, "FINISH" , CollaborationState.IS_FINISHED, true ); }); } public static AsyncNodeAction<CollaborationState> copywriterNode () { return node_async(state -> { log.info("[Copywriter] ✍ 收到文案撰写指令,开始创作..." ); String draft = "【Owlias AI 创新周报】2026年,多Agent协作架构(Multi-Agent System)成为企业标配。" ; log.info("[Copywriter] 撰写完成!" ); return mapOf( CollaborationState.COPYWRITING_RESULT, draft, CollaborationState.NEXT_AGENT, "SUPERVISOR" ); }); } public static AsyncNodeAction<CollaborationState> translatorNode () { return node_async(state -> { log.info("[Translator] 🌐 收到翻译指令,准备翻译..." ); String sourceText = state.getCopywritingResult(); if (sourceText.isEmpty()) { sourceText = state.getUserInput(); } log.info("[Translator] 正在对内容进行英译:\"{}\"" , sourceText); String translation = "[English Version] " + sourceText .replace("【Owlias AI 创新周报】" , "[Owlias AI Innovation Weekly] " ) .replace("成为企业标配" , "has become the enterprise standard" ); log.info("[Translator] 翻译完成!" ); return mapOf( CollaborationState.TRANSLATION_RESULT, translation, CollaborationState.NEXT_AGENT, "SUPERVISOR" ); }); } }
编写工作流图 1 2 3 4 5 6 7 8 9 10 11 12 13 14 15 16 17 18 19 20 21 22 23 24 25 26 27 28 29 30 31 32 33 34 35 36 37 38 39 40 41 42 43 44 45 46 47 48 49 50 51 52 53 54 55 56 57 58 59 import org.bsc.langgraph4j.CompiledGraph;import org.bsc.langgraph4j.GraphRepresentation;import org.bsc.langgraph4j.GraphStateException;import org.bsc.langgraph4j.StateGraph;import org.bsc.langgraph4j.action.AsyncEdgeAction;import org.springframework.context.annotation.Bean;import org.springframework.context.annotation.Configuration;import java.util.Map;import java.util.Objects;import static org.bsc.langgraph4j.StateGraph.END;import static org.bsc.langgraph4j.StateGraph.START;@Configuration public class MultiAgentGraphConfig { @Bean public CompiledGraph<CollaborationState> multiAgentGraph () throws GraphStateException { StateGraph<CollaborationState> graph = new StateGraph <>(CollaborationState.SCHEMA, CollaborationState::new ); graph.addNode("supervisor" , AgentNodes.supervisorNode()); graph.addNode("copywriter" , AgentNodes.copywriterNode()); graph.addNode("translator" , AgentNodes.translatorNode()); graph.addEdge(START, "supervisor" ); graph.addEdge("copywriter" , "supervisor" ); graph.addEdge("translator" , "supervisor" ); graph.addConditionalEdges("supervisor" , AsyncEdgeAction.edge_async(state -> { String next = state.getNextAgent(); if (Objects.equals("COPYWRITER" , next)) { return "copywriter" ; } else if (Objects.equals("translator" , next)) { return "translator" ; } else { return "end" ; } }), Map.of( "copywriter" , "copywriter" , "translator" , "translator" , "end" , END ) ); CompiledGraph<CollaborationState> compiledGraph = graph.compile(); System.out.println("\nMultiAgentGraph:: " + compiledGraph.getGraph(GraphRepresentation.Type.MERMAID) + "\n" ); return compiledGraph; } }
控制器与测试层 1 2 3 4 5 6 7 8 9 10 11 12 13 14 15 16 17 18 19 20 21 22 23 24 25 26 27 28 29 30 31 32 @Slf4j @RestController @RequestMapping("/api/collaboration") @RequiredArgsConstructor public class CollaborationController { private final CompiledGraph<CollaborationState> multiAgentGraph; @PostMapping("/run") public ResponseEntity<Map<String, Object>> executeTask (@RequestBody Map<String, String> request) { String userInput = request.getOrDefault("task" , "写一个关于AI的周报文案,并把它翻译成英文" ); log.info("▶ 收到协同任务:{}" , userInput); try { CollaborationState finalState = multiAgentGraph.invoke(mapOf( CollaborationState.USER_INPUT, userInput )).get(); return ResponseEntity.ok(Map.of( "status" , "SUCCESS" , "originalTask" , userInput, "copywriterOutput" , finalState.getCopywritingResult(), "translatorOutput" , finalState.getTranslationResult(), "summary" , "协作完成!结果已在 State 中成功合流并输出。" )); } catch (Exception e) { log.error("工作流执行异常" , e); return ResponseEntity.internalServerError().body(Map.of("error" , e.getMessage())); } } }
当你在 Postman 提交任务:{“task”: “写一段周报文案并翻译它”} 时,控制台的流转拓扑如下:
1
2
3
4
5
6
7
8
9
10
11
12
13
14
15
16
17
18
[START] │ ▼ [supervisor] ──────────────────────────┐ │ (检测到需要写文案) │ ▼ │ (检测到文案和翻译都已就绪) [copywriter] │ │ (写完文案,回传数据) │ ▼ ▼ [supervisor] [END] (合并最终 State 输出) │ (检测到文案已好,需翻译) ▲ ▼ │ [translator] ──────────────────────────┘ (读取文案,英译,回传数据)
并行任务案例 并行的介绍 简单来说,就是“分头行动,最后汇总”。在默认情况下,Agent 节点是串行(一个接一个)执行的。但如果有些任务彼此之间没有依赖关系,让他们同时运行可以极大地节省时间。
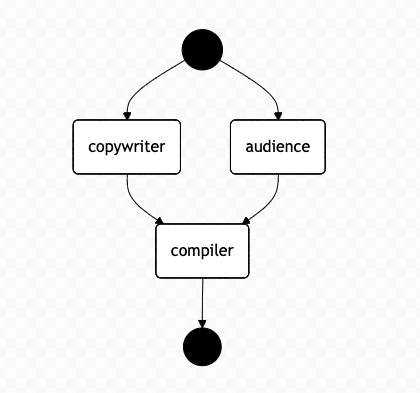
分叉(Fan-out):一个节点执行完毕后,同时触发多个专家节点并行工作。
汇聚(Fan-in / Merge):主管节点等待所有并行的专家节点都完成后,将它们写入 State 的数据合并,再决定下一步。
这就像团队要开发一个新页面:
串行执行:产品经理写完需求 -> UI 设计师画图 -> 前端开发写代码。这必须一步一步来。
并行执行:UI 视觉方案确定后,前端工程师写页面结构,后端工程师设计数据库和 API。两边同时开工,最后在 “接口对接” 阶段合流。这能缩短一半的开发周期。
这里以一个 “AI 营销周报一键生成” 的案例演示并行的实现。当用户输入一个产品主题时,我们同时(并行)派发两个专家任务,两个专家真正做到互不干扰、多线程并发执行:
文案专家(Copywriter):负责撰写吸引人的营销文案。
受众分析专家(Audience Analyzer):负责定位核心受众群体与推广痛点。
整合节点(Compiler / Merger):当两路并行任务全部就绪后,自动触发聚合节点,将文案和受众分析报告打包并格式化输出。
声明共享状态 1 2 3 4 5 6 7 8 9 10 11 12 13 14 15 16 17 18 19 20 21 22 23 24 25 26 27 28 29 30 31 32 33 34 35 36 37 38 39 40 import org.bsc.langgraph4j.state.AgentState;import org.bsc.langgraph4j.state.Channel;import org.bsc.langgraph4j.state.Channels;import java.util.Map;import static org.bsc.langgraph4j.utils.CollectionsUtils.mapOf;public class ParallelState extends AgentState { public static final String TOPIC = "topic" ; public static final String COPYWRITING_RESULT = "copywritingResult" ; public static final String AUDIENCE_RESULT = "audienceResult" ; public static final String FINAL_REPORT = "finalReport" ; public static final Map<String, Channel<?>> SCHEMA = mapOf( TOPIC, Channels.base(() -> "" ), COPYWRITING_RESULT, Channels.base(() -> "" ), AUDIENCE_RESULT, Channels.base(() -> "" ), FINAL_REPORT, Channels.base(() -> "" ) ); public ParallelState (Map<String, Object> initData) { super (initData); } public String getTopic () { return this .<String>value(TOPIC).orElse("" ); } public String getCopywritingResult () { return this .<String>value(COPYWRITING_RESULT).orElse("" ); } public String getAudienceResult () { return this .<String>value(AUDIENCE_RESULT).orElse("" ); } public String getFinalReport () { return this .<String>value(FINAL_REPORT).orElse("" ); } }
编写节点动作 1 2 3 4 5 6 7 8 9 10 11 12 13 14 15 16 17 18 19 20 21 22 23 24 25 26 27 28 29 30 31 32 33 34 35 36 37 38 39 40 41 42 43 44 45 46 47 48 49 50 import lombok.extern.slf4j.Slf4j;import java.util.Map;import static org.bsc.langgraph4j.utils.CollectionsUtils.mapOf;@Slf4j public class ParallelNodes { public static Map<String, Object> copywriterLogic (ParallelState state) { log.info("[Copywriter] 🚀 启动文案撰写..." ); try { Thread.sleep(1500 ); String copywriting = String.format("【爆款文案】想要告别繁琐的部署流程吗?「%s」带你体验一键上云的极致效率!" , state.getTopic()); log.info("[Copywriter] 完成。" ); return mapOf(ParallelState.COPYWRITING_RESULT, copywriting); } catch (InterruptedException e) { Thread.currentThread().interrupt(); return mapOf(ParallelState.COPYWRITING_RESULT, "" ); } } public static Map<String, Object> audienceLogic (ParallelState state) { log.info("[Audience] 🚀 启动受众分析..." ); try { Thread.sleep(2000 ); String audienceReport = String.format("【受众画像】主要针对一线城市的互联网开发者、架构师。解决他们对「%s」稳定性与扩展性的焦虑。" , state.getTopic()); log.info("[Audience] 完成。" ); return mapOf(ParallelState.AUDIENCE_RESULT, audienceReport); } catch (InterruptedException e) { Thread.currentThread().interrupt(); return mapOf(ParallelState.AUDIENCE_RESULT, "" ); } } public static Map<String, Object> compilerLogic (ParallelState state) { log.info("[Compiler] 🗃️ 整理终稿..." ); String finalReport = String.format( "================ 营销企划案 ================\n" + "主题: %s\n" + "%s\n" + "-------------------------------------------\n" + "%s\n" + "============================================" , state.getTopic(), state.getCopywritingResult(), state.getAudienceResult() ); log.info("[Compiler] 终稿整合完毕!" ); return mapOf(ParallelState.FINAL_REPORT, finalReport); } }
编写工作流图 1 2 3 4 5 6 7 8 9 10 11 12 13 14 15 16 17 18 19 20 21 22 23 24 25 26 27 28 29 30 31 32 33 34 35 36 37 38 39 40 41 42 43 44 45 46 47 48 49 50 51 52 53 54 55 56 57 58 59 60 61 62 63 64 65 66 67 68 69 70 71 72 73 74 75 import org.bsc.langgraph4j.CompiledGraph;import org.bsc.langgraph4j.GraphRepresentation;import org.bsc.langgraph4j.GraphStateException;import org.bsc.langgraph4j.StateGraph;import org.bsc.langgraph4j.action.AsyncNodeAction;import org.springframework.beans.factory.annotation.Qualifier;import org.springframework.context.annotation.Bean;import org.springframework.context.annotation.Configuration;import org.springframework.scheduling.concurrent.ThreadPoolTaskExecutor;import java.util.concurrent.CompletableFuture;import java.util.concurrent.Executor;import java.util.concurrent.ThreadPoolExecutor;import static org.bsc.langgraph4j.GraphDefinition.END;import static org.bsc.langgraph4j.GraphDefinition.START;@Configuration public class ParallelGraphConfig { @Bean(name = "agentExecutor") public Executor agentExecutor () { ThreadPoolTaskExecutor executor = new ThreadPoolTaskExecutor (); executor.setCorePoolSize(5 ); executor.setMaxPoolSize(10 ); executor.setQueueCapacity(25 ); executor.setThreadNamePrefix("agent-exec-" ); executor.setRejectedExecutionHandler(new ThreadPoolExecutor .CallerRunsPolicy()); executor.initialize(); return executor; } @Bean("parallelAgentGraph") public CompiledGraph<ParallelState> parallelAgentGraph (@Qualifier("agentExecutor") Executor agentExecutor) throws GraphStateException { StateGraph<ParallelState> graph = new StateGraph <>(ParallelState.SCHEMA, ParallelState::new ); AsyncNodeAction<ParallelState> copywriterNode = state -> CompletableFuture.supplyAsync(() -> ParallelNodes.copywriterLogic(state), agentExecutor); AsyncNodeAction<ParallelState> audienceNode = state -> CompletableFuture.supplyAsync(() -> ParallelNodes.audienceLogic(state), agentExecutor); graph.addNode("copywriter" , copywriterNode); graph.addNode("audience" , audienceNode); graph.addNode("compiler" , AsyncNodeAction.node_async(ParallelNodes::compilerLogic)); graph.addEdge(START, "copywriter" ); graph.addEdge(START, "audience" ); graph.addEdge("copywriter" , "compiler" ); graph.addEdge("audience" , "compiler" ); graph.addEdge("compiler" , END); CompiledGraph<ParallelState> compiledGraph = graph.compile(); System.out.println("\nParallelGraph:: " + compiledGraph.getGraph(GraphRepresentation.Type.MERMAID) + "\n" ); return compiledGraph; } }
测试入口 1 2 3 4 5 6 7 8 9 10 11 12 13 14 15 16 17 18 19 20 21 22 23 24 25 26 27 28 29 30 31 @Slf4j @RestController @RequestMapping("/api/parallel") @RequiredArgsConstructor public class ParallelController { private final CompiledGraph<ParallelState> parallelAgentGraph; @GetMapping("/run") public ResponseEntity<Map<String, Object>> runParallelTask (@RequestParam(defaultValue = "多Agent工作流引擎") String topic) { long startTime = System.currentTimeMillis(); log.info("▶ [Main] 接收到并行企划任务,主题: {}" , topic); try { ParallelState finalState = parallelAgentGraph.invoke(mapOf(ParallelState.TOPIC, topic)) .orElseThrow(() -> new IllegalStateException ("工作流执行完成,但未返回有效的 State 结果" )); long duration = System.currentTimeMillis() - startTime; log.info("🏁 [Main] 任务全部运行结束,总耗时:{} ms" , duration); return ResponseEntity.ok(Map.of( "topic" , topic, "totalDurationMs" , duration, "finalReport" , finalState.getFinalReport(), "explain" , "文案任务(模拟耗时 1.5s)与受众分析任务(模拟耗时 2.0s)并发执行。由于是并行,总耗时应接近最长任务的 2.0s 左右,而非 3.5s。" )); } catch (Exception e) { log.error("执行并行流程出错" , e); return ResponseEntity.internalServerError().body(Map.of("error" , e.getMessage())); } } }
用户请求和后台日志:
1
2
3
4
5
6
7
15:00:52.677 [agent-exec-1] INFO demo07.parallel.ParallelNodes - [Copywriter] 🚀 启动文案撰写... 15:00:52.678 [agent-exec-2] INFO demo07.parallel.ParallelNodes - [Audience] 🚀 启动受众分析... 15:00:54.181 [agent-exec-1] INFO demo07.parallel.ParallelNodes - [Copywriter] 完成。 15:00:54.683 [agent-exec-2] INFO demo07.parallel.ParallelNodes - [Audience] 完成。 15:00:54.686 [http-nio-8080-exec-2] INFO demo07.parallel.ParallelNodes - [Compiler] 🗃️ 整理终稿... 15:00:54.686 [http-nio-8080-exec-2] INFO demo07.parallel.ParallelNodes - [Compiler] 终稿整合完毕! 15:00:54.687 [http-nio-8080-exec-2] INFO demo07.parallel.ParallelController - 🏁 [Main] 任务全部运行结束,总耗时:2017 ms
Copywriter 消耗 1500 ms,Audience 消耗 2000 ms。在并行模式下,由于两者分头在各自的线程中执行,最终整个工作流的总耗时仅为 2017 ms 左右,成功节省了 1500 ms 的串行等待时间。
主图和子图 子图的概念 当你的多 Agent 系统变得非常庞大时,主图如果塞满了几十个节点和复杂的判断连线,代码就会变成一坨乱麻,极难维护。子图允许你把一组关系紧密、共同完成一个特定复杂目标的 Agent 节点打包成一个独立的“小图”。对主图来说,这个 “子图” 就像是一个普通的单一节点。
高内聚:子图内部有自己的局部 State、自己的主管和自己的专家。
沙盒隔离:主图不需要知道子图内部是怎么折腾的,只需要传输入参,并接收子图的最终出参。
比如研发一个新功能,团队现在壮大成了几十人的大部门:
没有子图:总经理(主图主管)直接管理 20 个开发和 10 个测试,每天纠结谁在写哪行代码、谁在测哪个 Bug。直接乱套。
引入子图:总经理把 5 个开发和 2 个测试打包成一个 “支付业务组(子图)”。总经理只对支付组说:“把微信支付接好。” 至于支付组内部是先写核心逻辑还是先写回调,总经理不关心,他只要支付组最终交付的“支付成功”状态。
在代码设计上,子图的定义和普通图完全一样,只是在主图中,你把它当成一个 Node 注册进去:
1 2 3 4 5 6 7 8 9 10 11 12 13 StateGraph<TranslationState> subGraph = new StateGraph <>(...); subGraph.addNode("detector" , ...); subGraph.addNode("translator" , ...); subGraph.addNode("proofreader" , ...); CompiledGraph<TranslationState> compiledSubGraph = subGraph.compile(); parentGraph.addNode("translation_subgraph_node" , compiledSubGraph); parentGraph.addEdge("supervisor" , "translation_subgraph_node" ); parentGraph.addEdge("translation_subgraph_node" , "end" );
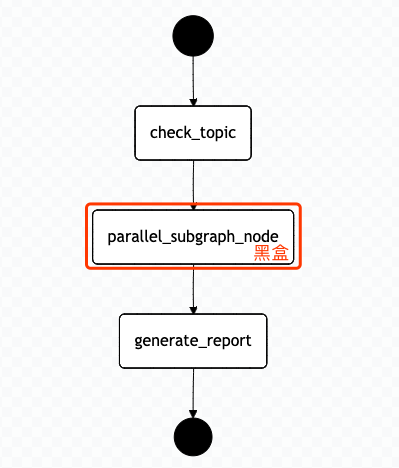
这里 ,我们复用上面 并行任务的案例 ,将其作为一个子图,外面封装一层简单包装的主图。拓扑如下:
声明共享状态 1 2 3 4 5 6 7 8 9 10 11 12 13 14 15 16 17 18 19 20 21 22 23 24 25 26 27 28 public class MainState extends AgentState { public static final String TOPIC = "topic" ; public static final String INPUT_REPORT = "inputReport" ; public static final String OUTPUT_REPORT = "finalReport" ; public static final Map<String, Channel<?>> SCHEMA = Map.of( TOPIC, Channels.base(() -> "" ), INPUT_REPORT, Channels.base(() -> "" ), OUTPUT_REPORT, Channels.base(() -> "" ) ); public MainState (Map<String, Object> initData) { super (initData); } public String getTopic () { return (String) data().get(TOPIC); } public String getInputReport () { return (String) data().get(INPUT_REPORT); } public String getOutputReport () { return (String) data().get(OUTPUT_REPORT); } }
编写节点动作 1 2 3 4 5 6 7 8 9 10 11 12 13 14 15 16 17 18 19 20 @Slf4j public class WorkflowNodes { public static Map<String, Object> checkTopicNode (MainState state) { String topic = state.getTopic(); log.info("[Main -> Checker] 🔍 正在校验主题安全性与合规性: {}" , topic); if (topic.contains("敏感" )) { throw new IllegalArgumentException ("违规主题,拒绝生成!" ); } return mapOf(); } public static Map<String, Object> generateReportNode (MainState state) { log.info("[Main -> Reporter] 🗃️ 主图接收到子图的合并数据,开始渲染最终企划书..." ); String inputReport = state.getInputReport(); String outputReport = String.format("主图输出关于 %s 的最终企划书:\n%s" , state.getTopic(), inputReport); return mapOf(MainState.OUTPUT_REPORT, outputReport); } }
编写工作流图 1 2 3 4 5 6 7 8 9 10 11 12 13 14 15 16 17 18 19 20 21 22 23 24 25 26 27 28 29 30 31 32 33 34 35 36 37 38 39 40 41 42 43 44 45 46 47 48 49 50 51 52 53 54 55 56 57 58 59 60 61 62 63 64 65 66 67 68 69 70 71 72 73 import demo07.parallel.ParallelState;import lombok.extern.slf4j.Slf4j;import org.bsc.langgraph4j.CompiledGraph;import org.bsc.langgraph4j.GraphRepresentation;import org.bsc.langgraph4j.StateGraph;import org.bsc.langgraph4j.action.AsyncNodeAction;import org.springframework.beans.factory.annotation.Qualifier;import org.springframework.context.annotation.Bean;import org.springframework.context.annotation.Configuration;import java.util.Map;import java.util.Optional;import java.util.concurrent.CompletableFuture;import java.util.concurrent.Executor;import static org.bsc.langgraph4j.GraphDefinition.END;import static org.bsc.langgraph4j.GraphDefinition.START;import static org.bsc.langgraph4j.utils.CollectionsUtils.mapOf;@Slf4j @Configuration public class SubgraphGraphConfig { private final CompiledGraph<ParallelState> compiledSubGraph; public SubgraphGraphConfig (CompiledGraph<ParallelState> compiledSubGraph) { this .compiledSubGraph = compiledSubGraph; } @Bean public CompiledGraph<MainState> mainWorkflowGraph (@Qualifier("agentExecutor") Executor workflowExecutor) throws Exception { AsyncNodeAction<MainState> subgraphNode = mainState -> { log.info("[Main] 🔀 正在将控制权交由子图(Subgraph)进行并行专家处理..." ); Map<String, Object> subInput = mapOf(ParallelState.TOPIC, mainState.getTopic()); return CompletableFuture.supplyAsync(() -> { Optional<ParallelState> optionalSubState = compiledSubGraph.invoke(subInput); String parallelStateFinalReport = optionalSubState .map(ParallelState::getFinalReport) .orElseThrow(() -> new IllegalStateException ("子图未能返回任何有效状态!" )); log.info("[Main] 📥 子图并行任务全数结束,数据收回主图。" ); return mapOf(MainState.INPUT_REPORT, parallelStateFinalReport); }, workflowExecutor); }; StateGraph<MainState> mainGraph = new StateGraph <>(MainState.SCHEMA, MainState::new ); mainGraph.addNode("check_topic" , AsyncNodeAction.node_async(WorkflowNodes::checkTopicNode)); mainGraph.addNode("parallel_subgraph_node" , subgraphNode); mainGraph.addNode("generate_report" , AsyncNodeAction.node_async(WorkflowNodes::generateReportNode)); mainGraph.addEdge(START, "check_topic" ); mainGraph.addEdge("check_topic" , "parallel_subgraph_node" ); mainGraph.addEdge("parallel_subgraph_node" , "generate_report" ); mainGraph.addEdge("generate_report" , END); CompiledGraph<MainState> compiledGraph = mainGraph.compile(); System.out.println("\nMainAndSubGraph:: " + compiledGraph.getGraph(GraphRepresentation.Type.MERMAID) + "\n" ); return compiledGraph; } }
测试入口 1 2 3 4 5 6 7 8 9 10 11 12 13 14 15 16 17 18 19 20 21 22 23 24 25 26 27 28 29 30 31 32 33 34 35 @Slf4j @RestController @RequestMapping("/api/workflow") @RequiredArgsConstructor public class WorkflowController { private final CompiledGraph<MainState> mainWorkflowGraph; @GetMapping("/run") public ResponseEntity<Map<String, Object>> runWorkflow (@RequestParam(defaultValue = "多Agent子图嵌套") String topic) { long startTime = System.currentTimeMillis(); log.info("▶ [Controller] 收到复杂企划任务,开始启动主工作流,主题: {}" , topic); try { MainState finalState = mainWorkflowGraph.invoke(mapOf(MainState.TOPIC, topic)) .orElseThrow(() -> new IllegalStateException ("主图未返回有效的 State" )); long duration = System.currentTimeMillis() - startTime; log.info("🏁 [Controller] 全流程全部运行结束,总耗时:{} ms" , duration); return ResponseEntity.ok(Map.of( "status" , "SUCCESS" , "totalDurationMs" , duration, "finalReport" , finalState.getOutputReport() )); } catch (Exception e) { log.error("全流程执行出错" , e); return ResponseEntity.internalServerError().body(Map.of( "status" , "FAILED" , "error" , e.getMessage() )); } } }
请求和日志:
1 2 3 4 5 6 7 8 9 10 11 12 13 14 15 16 17 18 19 20 21 22 $ curl http://localhost:8080/api/workflow/run?topic=Owlias的扩展 15:17:38.868 [http-nio-8080-exec-1] INFO demo07.subgraph.WorkflowController - ▶ [Controller] 收到复杂企划任务,开始启动主工作流,主题: Owlias的扩展 15:17:38.870 [http-nio-8080-exec-1] INFO demo07.subgraph.WorkflowNodes - [Main -> Checker] 🔍 正在校验主题安全性与合规性: Owlias的扩展 15:17:38.871 [http-nio-8080-exec-1] INFO demo07.subgraph.SubgraphGraphConfig - [Main] 🔀 正在将控制权交由子图(Subgraph)进行并行专家处理... 15:17:38.875 [agent-exec-2] INFO demo07.parallel.ParallelNodes - [Copywriter] 🚀 启动文案撰写... 15:17:38.876 [agent-exec-3] INFO demo07.parallel.ParallelNodes - [Audience] 🚀 启动受众分析... 15:17:40.381 [agent-exec-2] INFO demo07.parallel.ParallelNodes - [Copywriter] 完成。 15:17:40.879 [agent-exec-3] INFO demo07.parallel.ParallelNodes - [Audience] 完成。 15:17:40.882 [agent-exec-1] INFO demo07.parallel.ParallelNodes - [Compiler] 🗃️ 整理终稿... 15:17:40.882 [agent-exec-1] INFO demo07.parallel.ParallelNodes - [Compiler] 终稿整合完毕! 15:17:40.884 [agent-exec-1] INFO demo07.subgraph.SubgraphGraphConfig - [Main] 📥 子图并行任务全数结束,数据收回主图。 15:17:40.885 [http-nio-8080-exec-1] INFO demo07.subgraph.WorkflowNodes - [Main -> Reporter] 🗃️ 主图接收到子图的合并数据,开始渲染最终企划书... 15:17:40.885 [http-nio-8080-exec-1] INFO demo07.subgraph.WorkflowController - 🏁 [Controller] 全流程全部运行结束,总耗时:2017 ms { "finalReport" : "================ 营销企划案 ================\n主题: 多Agent工作流引擎\n【爆款文案】想要告别繁琐的部署流程吗?「多Agent工作流引擎」带你体验一键上云的极致效率!\n-------------------------------------------\n【受众画像】主要针对一线城市的互联网开发者、架构师。解决他们对「多Agent工作流引擎」稳定性与扩展性的焦虑。\n============================================" , "totalDurationMs" : 2008, "topic" : "多Agent工作流引擎" , "explain" : "文案任务(模拟耗时 1.5s)与受众分析任务(模拟耗时 2.0s)并发执行。由于是并行,总耗时应接近最长任务的 2.0s 左右,而非 3.5s。" }
标题:
Langgraph4j - 基础介绍和案例演示(二)