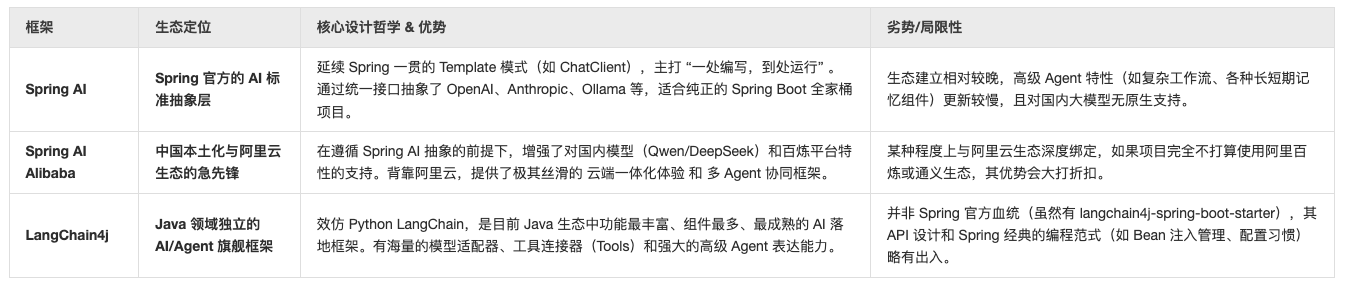
Spring AI Alibaba(SAA)简介 生态对照 Spring AI Alibaba 是阿里云与 Spring 官方团队联合开发的 Spring AI 官方生态分支。它基于 Spring AI 的统一抽象,专门针对中国本土的 AI 生态(主要是阿里云百炼平台、 通义千问(Qwen)、以及国内部署的 DeepSeek 等大模型)进行了深度适配。它可以一键自动装配百炼 API、原生支持国内开发者常用的流式输出、向量数据库,并推出了配套的 spring-ai-alibaba-agent-framework,让国内开发者能更方便写出复杂的 AI Agent。
关于 Spring AI、Spring AI Alibaba、LangChain4j 三者各自的定位,可以用下面的表格总结:
选型参考
如果是国内商业项目/政企项目,且计划接入阿里云百炼、通义千问或合规的国内 DeepSeek,Spring AI Alibaba 是毫无疑问的最优解,它省去了你 90% 的适配心力。
如果你在做国际化项目,或者是老牌的 Spring Boot 3.x 拥趸,喜欢简洁的类声明,首选 Spring AI。
如果项目需要实现极其复杂的 Agent、多步 RAG 检索、或者需要对接各种奇葩的第三方工具和向量库,且对 Spring 官方血统没有硬性强迫症,那么现阶段 LangChain4j 依然是功能最稳健的“重工业级武器”。
基础案例 依赖配置 父项目依赖配置参考:父项目 POM
1 2 3 4 5 6 7 8 9 10 11 12 13 14 15 16 17 18 19 20 21 22 23 24 25 26 27 28 29 30 31 32 <dependencies > <dependency > <groupId > org.springframework.boot</groupId > <artifactId > spring-boot-starter-webflux</artifactId > </dependency > <dependency > <groupId > com.alibaba.cloud.ai</groupId > <artifactId > spring-ai-alibaba-starter-dashscope</artifactId > </dependency > <dependency > <groupId > com.alibaba.cloud.ai</groupId > <artifactId > spring-ai-alibaba-agent-framework</artifactId > </dependency > <dependency > <groupId > org.springframework.ai</groupId > <artifactId > spring-ai-starter-model-openai</artifactId > </dependency > </dependencies >
配置文件 1 2 3 4 5 6 7 8 9 10 11 12 13 14 15 16 17 18 19 20 21 22 23 24 25 26 27 28 29 30 31 32 33 34 server: port: 8080 servlet: encoding: charset: UTF-8 enabled: true force: true spring: ai: dashscope: api-key: ${QWEN_API_KEY} openai: api-key: api-key-xxx base-url: http://localhost:11434 chat: options: model: gemma3:1b logging: level: org.springframework.ai.chat.client.advisor: DEBUG org.springframework.ai: DEBUG org.springframework.web.client.RestClient: DEBUG
基础配置类 SsaLLMConfig
1 2 3 4 5 6 7 8 9 10 11 12 13 14 15 16 17 18 19 20 21 22 23 24 25 26 27 28 29 30 31 32 33 34 35 36 37 38 39 40 41 42 43 44 45 46 47 48 49 50 51 52 53 54 55 56 57 58 59 60 61 62 63 64 65 66 67 68 69 70 71 72 73 74 75 76 77 78 79 80 81 82 83 84 85 86 87 88 89 90 91 92 93 94 95 import com.alibaba.cloud.ai.dashscope.api.DashScopeApi;import com.alibaba.cloud.ai.dashscope.chat.DashScopeChatModel;import com.alibaba.cloud.ai.dashscope.chat.DashScopeChatOptions;import org.springframework.ai.chat.client.ChatClient;import org.springframework.ai.chat.client.advisor.SimpleLoggerAdvisor;import org.springframework.ai.chat.model.ChatModel;import org.springframework.beans.factory.annotation.Qualifier;import org.springframework.boot.web.client.RestClientCustomizer;import org.springframework.context.annotation.Bean;import org.springframework.context.annotation.Configuration;import org.springframework.http.client.SimpleClientHttpRequestFactory;import java.time.Duration;@Configuration public class SsaLLMConfig { private static final String apiKey; static { apiKey = System.getenv("QWEN_API_KEY" ); } @Bean public RestClientCustomizer restClientCustomizer () { return restClientBuilder -> { SimpleClientHttpRequestFactory factory = new SimpleClientHttpRequestFactory (); factory.setReadTimeout(Duration.ofSeconds(300 )); factory.setConnectTimeout(Duration.ofSeconds(100 )); restClientBuilder.requestFactory(factory); }; } @Bean("dashScopeApi") public DashScopeApi dashScopeApi () { return DashScopeApi.builder().apiKey(apiKey).build(); } @Bean("qwenChatModel") public ChatModel qwenChatModel (DashScopeApi dashScopeApi) { return DashScopeChatModel.builder() .dashScopeApi(dashScopeApi) .defaultOptions(DashScopeChatOptions.builder().model("qwen-plus" ).build()) .build(); } @Bean("deepseekChatModel") public ChatModel deepseekChatModel (DashScopeApi dashScopeApi) { return DashScopeChatModel.builder() .dashScopeApi(dashScopeApi) .defaultOptions(DashScopeChatOptions.builder().model("deepseek-v4-flash" ).build()) .build(); } @Bean("dashScopeChatClient") public ChatClient dashScopeChatClient (@Qualifier("dashScopeChatModel") ChatModel dashScopeChatModel) { return ChatClient.builder(dashScopeChatModel) .defaultAdvisors(new SimpleLoggerAdvisor ()) .build(); } @Bean("deepseekChatClient") public ChatClient deepseekChatClient (@Qualifier("deepseekChatModel") ChatModel deepseekChatModel) { return ChatClient.builder(deepseekChatModel) .defaultAdvisors(new SimpleLoggerAdvisor ()) .build(); } }
Hello Wolrd 冒烟测试 HelloWorldController
1
2
3
4
5
6
7
8
9
10
11
12
13
14
15
16
17
18
19
20
21
22
23
24
25
26
27
28
29
30
31
32
33
34
35
36
37
38
39
40
41
42
43
44
45
46
47
48
49
50
51
52
53
54
import jakarta.annotation.Resource;import org.springframework.ai.chat.client.ChatClient;import org.springframework.ai.chat.model.ChatModel;import org.springframework.http.MediaType;import org.springframework.web.bind.annotation.GetMapping;import org.springframework.web.bind.annotation.RequestMapping;import org.springframework.web.bind.annotation.RequestParam;import org.springframework.web.bind.annotation.RestController;import reactor.core.publisher.Flux;import reactor.core.publisher.Mono;import reactor.core.scheduler.Schedulers;@RestController @RequestMapping("/hello") public class HelloWorldController { @Resource(name = "openAiChatModel") private ChatModel chatModel; @Resource(name = "deepseekChatClient") private ChatClient chatClient; @GetMapping(value = "/sayHello1", produces = MediaType.TEXT_PLAIN_VALUE) public Mono<String> sayHello1 (@RequestParam(required = false, defaultValue = "-1") Long userId, @RequestParam(defaultValue = "你是谁") String message) { return Mono.fromCallable(() -> chatModel.call(message)) .subscribeOn(Schedulers.boundedElastic()); } @GetMapping(value = "/sayHello2", produces = MediaType.TEXT_PLAIN_VALUE) public Flux<String> sayHello2 (@RequestParam(required = false, defaultValue = "-1") Long userId, @RequestParam(defaultValue = "你是谁") String message) { return chatModel.stream(message); } @GetMapping(value = "/sayHello3", produces = MediaType.TEXT_PLAIN_VALUE) public Mono<String> sayHello3 (@RequestParam(required = false, defaultValue = "-1") Long userId, @RequestParam(defaultValue = "你是谁") String message) { return Mono.fromCallable(() -> chatClient.prompt() .user(message) .call() .content() ).subscribeOn(Schedulers.boundedElastic()); } @GetMapping(value = "/sayHello4", produces = MediaType.TEXT_PLAIN_VALUE) public Flux<String> sayHello4 (@RequestParam(required = false, defaultValue = "-1") Long userId, @RequestParam(defaultValue = "你是谁") String message) { return chatClient.prompt() .user(message) .stream() .content(); } }
resources/public/index.html
1
2
3
4
5
6
7
8
9
10
11
12
13
14
15
16
17
18
19
20
21
22
23
24
25
26
27
28
29
30
31
32
33
34
35
36
37
38
39
40
41
42
43
44
45
46
47
48
49
50
51
52
53
54
55
56
57
58
59
60
61
62
63
64
65
66
67
68
69
70
71
72
73
74
75
<!DOCTYPE html > <html lang ="zh-CN" > <head > <meta charset ="UTF-8" > <title > Owlias 聊天室 (SSE版)</title > <style > body { font-family : sans-serif; max-width : 600px ; margin : 20px auto; padding : 0 10px ; } #chatBox { border : 1px solid #ccc ; height : 400px ; overflow-y : auto; padding : 10px ; margin-bottom : 10px ; } .user-msg { color : blue; margin : 10px 0 ; } .bot-msg { color : green; margin : 10px 0 ; white-space : pre-wrap; } #inputArea { display : flex; gap : 10px ; } input { flex : 1 ; padding : 8px ; } button { padding : 8px 15px ; } </style > </head > <body > <h2 > Owlias 问答聊天室</h2 > <div id ="chatBox" > </div > <div id ="inputArea" > <input type ="text" id ="msgInput" placeholder ="输入消息,按回车发送..." onkeydown ="if(event.key==='Enter') send()" > <button onclick ="send()" > 发送</button > </div > <script > const chatBox = document .getElementById ('chatBox' ); const msgInput = document .getElementById ('msgInput' ); async function send ( const message = msgInput.value .trim (); if (!message) return ; appendMessage ('我: ' + message, 'user-msg' ); msgInput.value = '' ; const botDiv = appendMessage ('AI: ' , 'bot-msg' ); try { const response = await fetch (`/hello/sayHello2?userId=1&message=${encodeURIComponent (message)} ` ); if (!response.ok ) throw new Error ('网络请求失败' ); const reader = response.body .getReader (); const decoder = new TextDecoder (); while (true ) { const { value, done } = await reader.read (); if (done) break ; botDiv.textContent += decoder.decode (value, { stream : true }); chatBox.scrollTop = chatBox.scrollHeight ; } } catch (error) { botDiv.textContent += '[ 发生错误: ' + error.message + ' ]' ; } } function appendMessage (text, className ) { const div = document .createElement ('div' ); div.className = className; div.textContent = text; chatBox.appendChild (div); chatBox.scrollTop = chatBox.scrollHeight ; return div; } </script > </body > </html >
提示词相关测试 1 2 3 4 5 6 7 8 9 10 11 12 13 14 15 16 17 18 19 20 21 22 23 24 25 26 27 28 29 30 31 32 33 34 35 36 37 38 39 40 41 42 43 44 45 46 47 48 49 50 51 52 53 54 55 56 57 58 59 60 61 62 63 64 65 66 67 68 69 70 71 72 73 74 75 76 77 78 79 80 81 82 83 84 85 86 87 88 89 90 91 92 93 94 95 96 97 98 99 100 101 102 103 104 105 106 107 108 109 110 111 112 113 114 115 116 117 118 119 120 121 122 123 import com.demo04.tools.WeatherTool;import jakarta.annotation.Resource;import org.springframework.ai.chat.client.ChatClient;import org.springframework.ai.chat.messages.SystemMessage;import org.springframework.ai.chat.messages.UserMessage;import org.springframework.ai.chat.model.ChatModel;import org.springframework.ai.chat.model.ChatResponse;import org.springframework.ai.chat.prompt.Prompt;import org.springframework.ai.chat.prompt.PromptTemplate;import org.springframework.beans.factory.annotation.Value;import org.springframework.http.MediaType;import org.springframework.web.bind.annotation.GetMapping;import org.springframework.web.bind.annotation.RequestMapping;import org.springframework.web.bind.annotation.RequestParam;import org.springframework.web.bind.annotation.RestController;import reactor.core.publisher.Flux;import java.util.Map;@RestController @RequestMapping("/prompt-test") public class PromptTestController { @Resource(name = "deepseekChatClient") private ChatClient chatClient; @Resource(name = "deepseekChatModel") private ChatModel chatModel; @Resource private WeatherTool weatherTool; @GetMapping(value = "/test01-edu-assistant", produces = MediaType.TEXT_PLAIN_VALUE) public Flux<String> test01 (@RequestParam(required = false, defaultValue = "-1") Long userId, @RequestParam String message) { return chatClient.prompt() .system("你是一个教育小助手专家,请你只回答教育类问题,其他问题回复,我只能回答教育相关问题,其他无可奉告。" ) .user(message) .stream() .content(); } @GetMapping(value = "/test02-story-assistant", produces = MediaType.TEXT_PLAIN_VALUE) public Flux<String> test02 (@RequestParam(required = false, defaultValue = "-1") Long userId, @RequestParam String message) { SystemMessage systemMessage = new SystemMessage ("你是一个讲故事小能手,每个故事限定在200字以内。" ); UserMessage userMessage = new UserMessage (message); Prompt prompt = new Prompt (systemMessage, userMessage); Flux<ChatResponse> stream = chatModel.stream(prompt); return stream.mapNotNull(response -> response.getResult().getOutput().getText()); } @GetMapping(value = "/test03-weather-assistant", produces = MediaType.TEXT_PLAIN_VALUE) public Flux<String> test03 (@RequestParam String message) { return chatClient.prompt() .system("你是一个贴心的生活气象小助手。" ) .user(message) .tools(weatherTool) .stream() .content(); } @GetMapping(value = "/test031-weather-assistant", produces = MediaType.TEXT_PLAIN_VALUE) public Flux<String> test031 (@RequestParam String message) { ToolCallingChatOptions weatherChatOptions = ToolCallingChatOptions.builder() .toolCallbacks(ToolCallbacks.from(new WeatherTool ())) .build(); Flux<ChatResponse> stream = chatModel.stream(Prompt .builder() .messages(new SystemMessage ("你是一个贴心的生活气象小助手。" ), new UserMessage (message)) .chatOptions(weatherChatOptions) .build()); return stream.mapNotNull(response -> response.getResult().getOutput().getText()); } @GetMapping(value = "/test04") public Flux<String> test04 (String topic, String outputFormat, String wordCount) { PromptTemplate promptTemplate = new PromptTemplate (""" 讲一个关于{topic}的故事,并以{output_format}的格式输出,字数在{word_count}左右。 """ ); Prompt prompt = promptTemplate.create( Map.of("topic" , topic, "output_format" , outputFormat, "word_count" , wordCount) ); return chatClient.prompt(prompt) .stream() .content(); } @Value("classpath:/prompt/story-system-prompt.txt") private org.springframework.core.io.Resource storyPromptTemplate; @GetMapping(value = "/test05") public Flux<String> test05 (String topic, String outputFormat, String wordCount) { PromptTemplate promptTemplate = new PromptTemplate (storyPromptTemplate); Prompt prompt = promptTemplate.create( Map.of("topic" , topic, "output_format" , outputFormat, "word_count" , wordCount) ); return chatClient.prompt(prompt) .stream() .content(); } }
WeatherTool:
1
2
3
4
5
6
7
8
9
10
11
12
13
14
15
16
17
18
19
20
21
22
23
import lombok.extern.slf4j.Slf4j;import org.springframework.ai.tool.annotation.Tool;import org.springframework.stereotype.Component;@Slf4j @Component("weatherTool") public class WeatherTool { public record WeatherRequest (String location) {} public record WeatherResponse (String location, String temperature, String info, String wind) {} @Tool(description = "根据城市名称或地点获取当前的实时天气预报") public WeatherResponse chatWeather (WeatherRequest request) { log.info("请求获取天气信息:{}" , request); if (request.location().contains("北京" )) { return new WeatherResponse ("北京" , "1℃" , "晴朗" , "北风3级" ); } else if (request.location().contains("上海" )) { return new WeatherResponse ("上海" , "2℃" , "大雨" , "东风2级" ); } else { return new WeatherResponse (request.location(), "20℃" , "阴天" , "微风" ); } } }
格式化输出测试 1 2 3 4 5 6 7 8 9 10 11 12 13 14 15 16 17 18 19 20 21 22 23 24 25 26 27 28 29 30 31 32 33 34 35 36 37 38 39 40 41 42 43 44 45 46 47 48 49 50 51 52 53 54 55 56 57 58 59 60 61 62 63 64 65 import jakarta.annotation.Resource;import org.springframework.ai.chat.client.ChatClient;import org.springframework.ai.chat.messages.SystemMessage;import org.springframework.ai.chat.messages.UserMessage;import org.springframework.ai.chat.model.ChatModel;import org.springframework.ai.chat.prompt.Prompt;import org.springframework.ai.converter.BeanOutputConverter;import org.springframework.http.MediaType;import org.springframework.web.bind.annotation.GetMapping;import org.springframework.web.bind.annotation.RequestMapping;import org.springframework.web.bind.annotation.RequestParam;import org.springframework.web.bind.annotation.RestController;import reactor.core.publisher.Mono;import reactor.core.scheduler.Schedulers;import java.util.List;@RestController @RequestMapping("/output-format-test") public class OutputFormatTestController { record StudentRecord (String id, String name, String email) {} @Resource(name = "deepseekChatClient") private ChatClient chatClient; @Resource(name = "openAiChatModel") private ChatModel chatModel; @GetMapping(value = "/test01", produces = MediaType.APPLICATION_JSON_VALUE) public Mono<StudentRecord> test01 (@RequestParam(required = false, defaultValue = "-1") Long userId, @RequestParam String message) { return Mono.fromSupplier(() -> chatClient.prompt() .system("你是一个专业的学校教务信息提取助手。请从用户的文字中精准提取学生的信息。" ) .user(userSpec -> userSpec.text(message)) .call() .entity(StudentRecord.class) ).subscribeOn(Schedulers.boundedElastic()); } @GetMapping(value = "/test02", produces = MediaType.APPLICATION_JSON_VALUE) public Mono<StudentRecord> test02 (@RequestParam(required = false, defaultValue = "-1") Long userId, @RequestParam String message) { return Mono.fromSupplier(() -> { BeanOutputConverter<StudentRecord> converter = new BeanOutputConverter <>(StudentRecord.class); String jsonFormatInstructions = converter.getFormat(); SystemMessage systemMessage = new SystemMessage ("你是一个专业的学校教务信息提取助手。请从用户的文字中精准提取学生的信息。" ); UserMessage userMessage = new UserMessage (message + "\n" + jsonFormatInstructions); Prompt prompt = new Prompt (List.of(systemMessage, userMessage)); String rawJsonResult = chatModel.call(prompt).getResult().getOutput().getText(); return converter.convert(rawJsonResult); }).subscribeOn(Schedulers.boundedElastic()); } }
会话记忆支持 继续引入依赖:
1 2 3 4 5 <dependency > <groupId > com.alibaba.cloud.ai</groupId > <artifactId > spring-ai-alibaba-starter-memory-redis</artifactId > </dependency >
修改 SaaLLMConfig:
1 2 3 4 5 6 7 8 9 10 11 12 13 14 15 16 17 18 19 20 21 22 23 24 25 26 27 28 29 30 31 32 33 34 35 36 37 38 39 40 41 42 43 44 45 46 47 48 49 @Bean public LettuceRedisChatMemoryRepository lettuceRedisChatMemoryRepository () { return LettuceRedisChatMemoryRepository.builder() .host("127.0.0.1" ) .port(6379 ) .timeout(5000 ) .build(); } @Bean public ChatMemory chatMemory (LettuceRedisChatMemoryRepository repository) { return MessageWindowChatMemory.builder() .chatMemoryRepository(repository) .maxMessages(10 ) .build(); } @Bean("dashScopeChatClient") public ChatClient dashScopeChatClient (@Qualifier("dashScopeChatModel") ChatModel dashScopeChatModel, ChatMemory chatMemory) { return ChatClient.builder(dashScopeChatModel) .defaultAdvisors( MessageChatMemoryAdvisor.builder(chatMemory).build(), new SimpleLoggerAdvisor ()) .build(); } @Bean("deepseekChatClient") public ChatClient deepseekChatClient (@Qualifier("deepseekChatModel") ChatModel deepseekChatModel, ChatMemory chatMemory) { return ChatClient.builder(deepseekChatModel) .defaultAdvisors( MessageChatMemoryAdvisor.builder(chatMemory).build(), new SimpleLoggerAdvisor ()) .build(); }
测试 controller:
1 2 3 4 5 6 7 8 9 10 11 12 13 14 15 16 17 18 19 20 21 22 23 24 25 26 @RestController @RequestMapping("/chat-memory-test") public class ChatMemoryTestController { @Resource(name = "deepseekChatClient") private ChatClient chatClient; @GetMapping(value = "/test01", produces = MediaType.TEXT_PLAIN_VALUE) public Flux<String> sayHello4 (@RequestParam Long userId, @RequestParam String message) { return chatClient.prompt() .user(message) .advisors(spec -> spec.param(ChatMemory.CONVERSATION_ID, userId)) .stream() .content(); } }
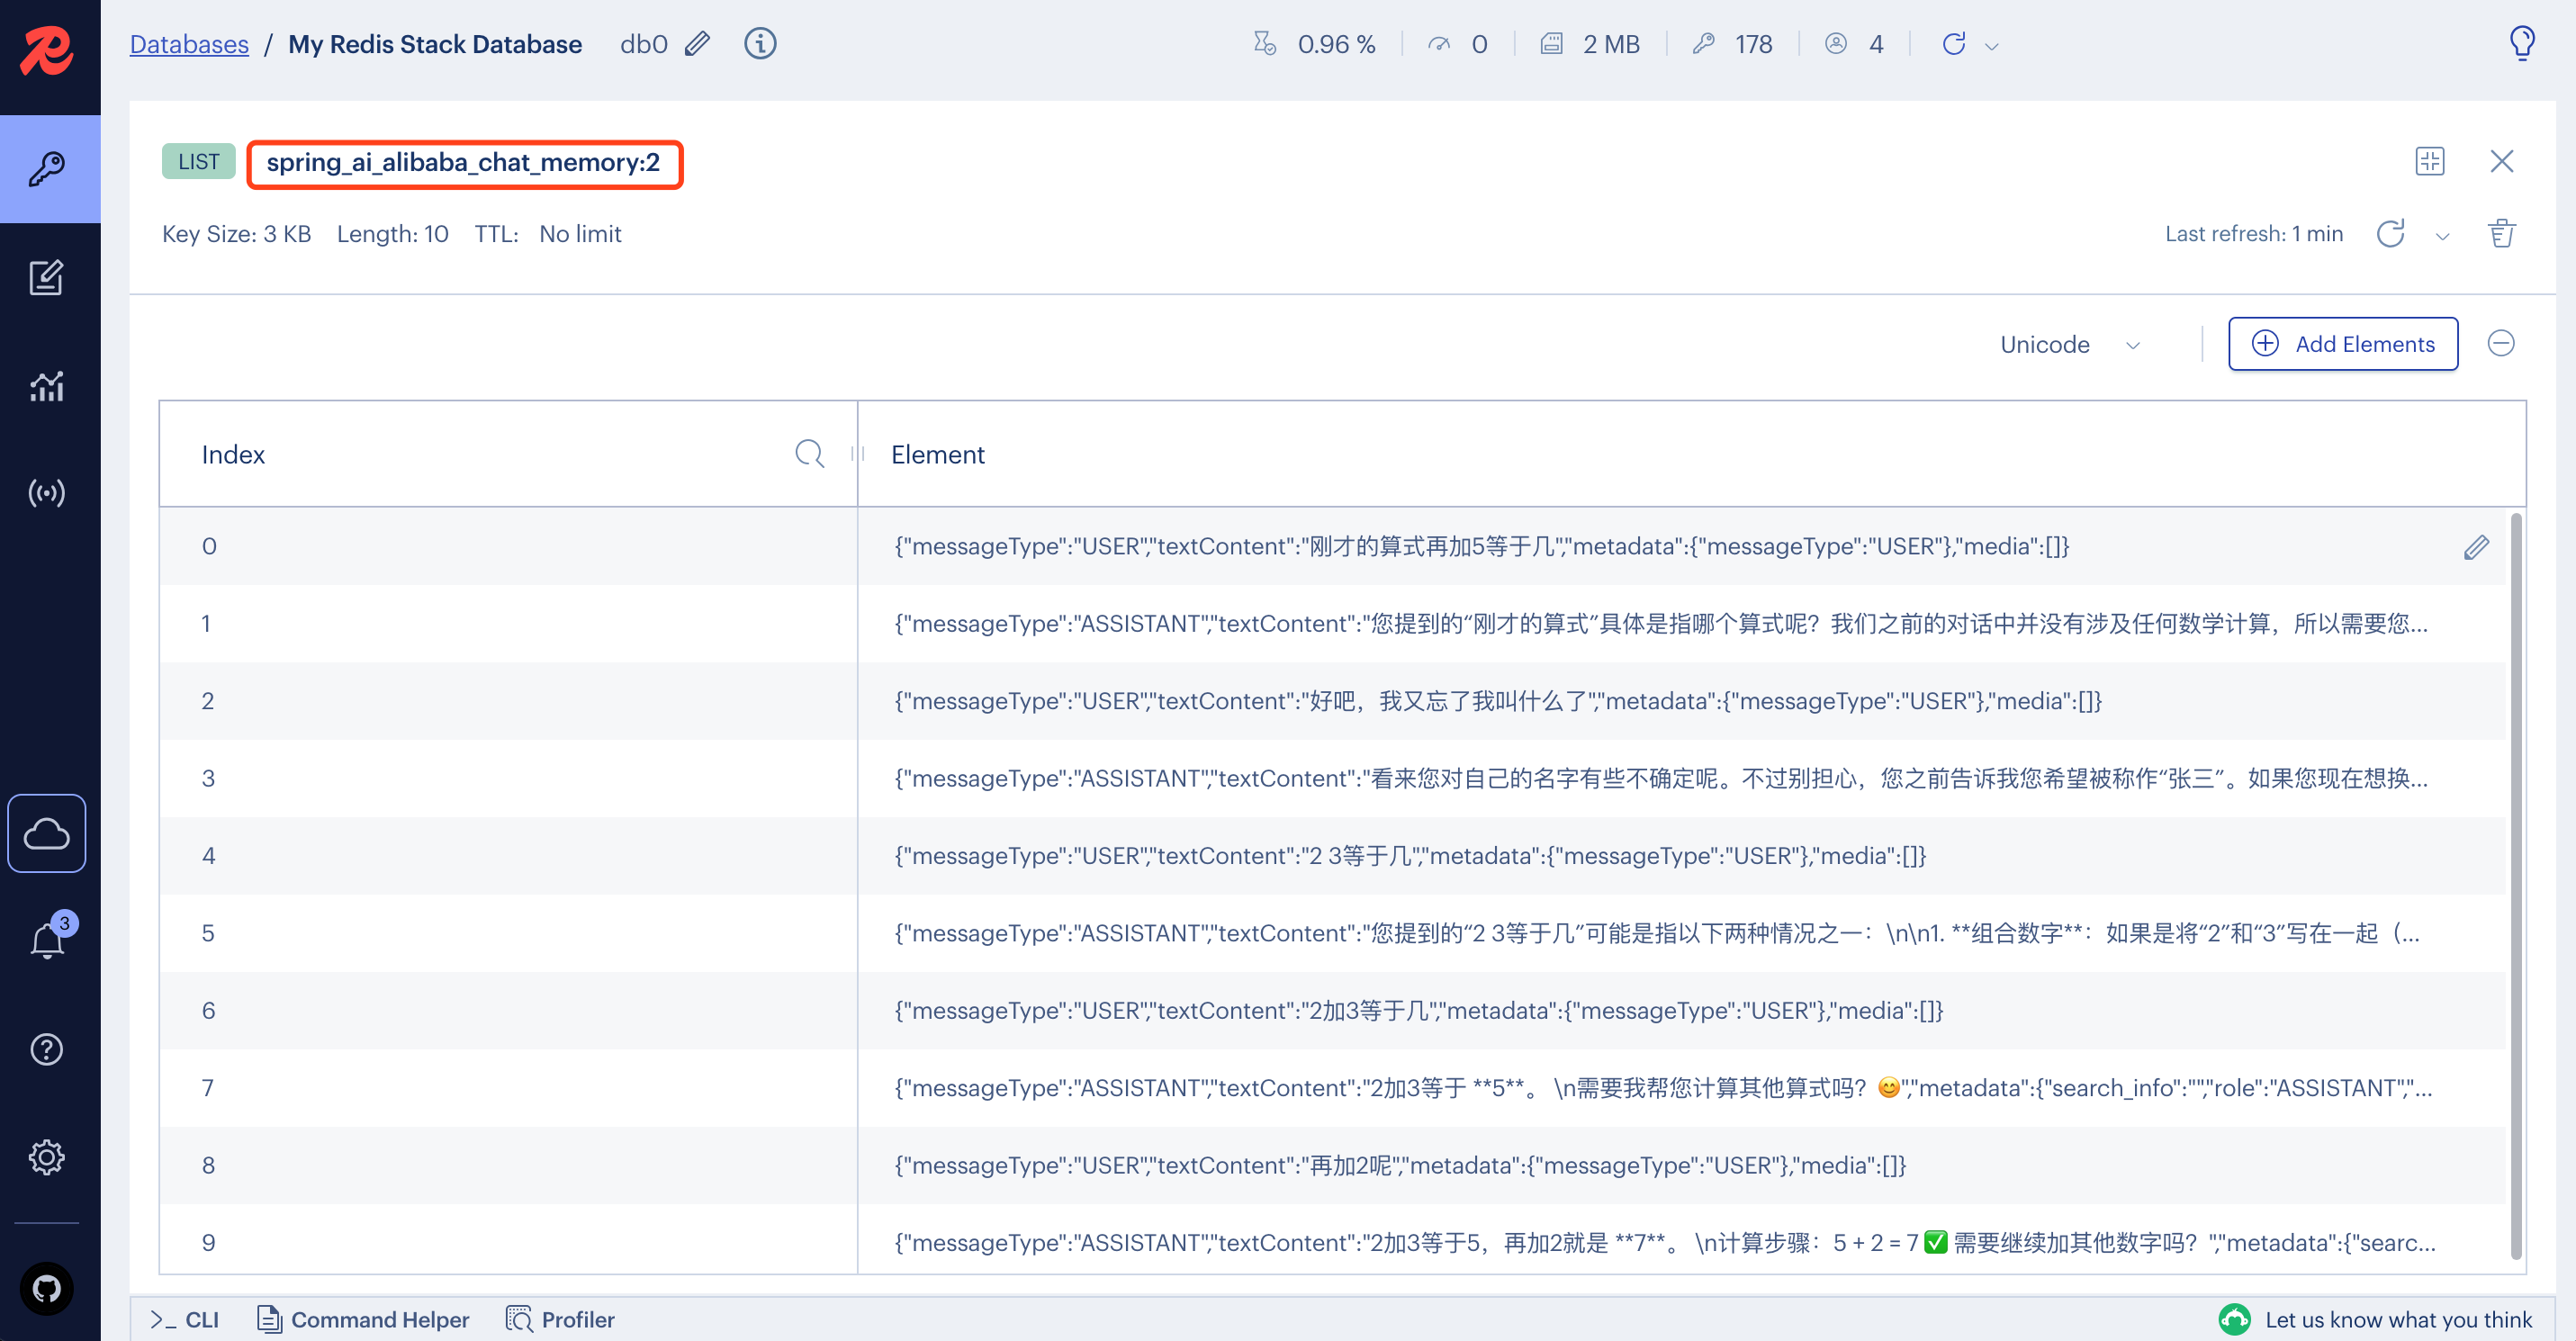
对应 redis 的数据结构(用户 userId=2),key 的名称定义在 BaseRedisChatMemoryRepository:
万象文生图 1 2 3 4 5 6 7 8 9 10 11 12 13 14 15 16 17 18 19 20 21 22 23 24 25 26 27 28 29 30 31 32 33 34 35 36 37 38 39 40 41 42 43 44 45 46 47 48 49 50 51 52 53 54 55 56 57 58 59 60 61 62 63 64 65 66 67 68 69 70 71 72 73 74 75 76 import jakarta.annotation.Resource;import org.springframework.ai.image.ImageModel;import org.springframework.ai.image.ImageOptionsBuilder;import org.springframework.ai.image.ImagePrompt;import org.springframework.ai.image.ImageResponse;import org.springframework.web.bind.annotation.GetMapping;import org.springframework.web.bind.annotation.RequestMapping;import org.springframework.web.bind.annotation.RequestParam;import org.springframework.web.bind.annotation.RestController;import reactor.core.publisher.Mono;import reactor.core.scheduler.Schedulers;import java.util.List;import java.util.stream.Collectors;@RestController @RequestMapping("/image-model-test") public class ImageModelTestController { @Resource(name = "dashScopeImageModel") private ImageModel imageModel; @GetMapping("/generate") public Mono<String> generateImage (@RequestParam String prompt) { return Mono.fromCallable(() -> { var options = ImageOptionsBuilder.builder() .height(1024 ) .width(1024 ) .build(); ImagePrompt imagePrompt = new ImagePrompt (prompt, options); ImageResponse response = imageModel.call(imagePrompt); return response.getResult().getOutput().getUrl(); }).subscribeOn(Schedulers.boundedElastic()); } @GetMapping("/generate-batch") public Mono<List<String>> generateImageBatch (@RequestParam String prompt, @RequestParam(defaultValue = "1") int count) { return Mono.fromCallable(() -> { var options = ImageOptionsBuilder.builder() .height(768 ) .width(1024 ) .N(count) .build(); ImagePrompt imagePrompt = new ImagePrompt (prompt, options); ImageResponse response = imageModel.call(imagePrompt); return response.getResults().stream() .map(result -> result.getOutput().getUrl()) .collect(Collectors.toList()); }).subscribeOn(Schedulers.boundedElastic()); } }
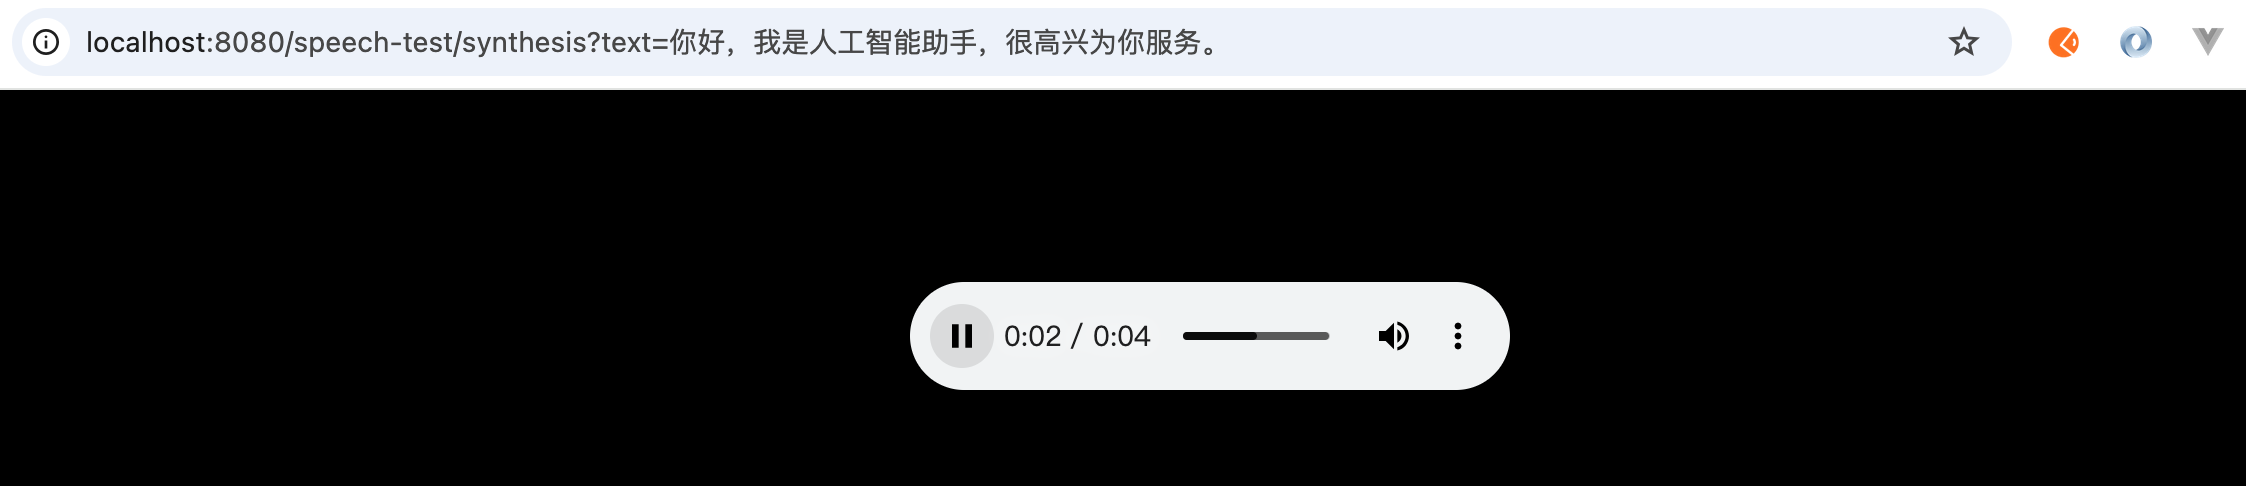
CosyVoice 文生音 1 2 3 4 5 6 7 8 9 10 11 12 13 14 15 16 17 18 19 20 21 22 23 24 25 26 27 28 29 30 31 32 33 34 35 36 37 38 39 40 41 42 43 44 45 46 47 import com.alibaba.cloud.ai.dashscope.audio.DashScopeAudioSpeechModel;import com.alibaba.cloud.ai.dashscope.audio.DashScopeAudioSpeechOptions;import jakarta.annotation.Resource;import org.springframework.ai.audio.tts.TextToSpeechPrompt;import org.springframework.core.io.buffer.DataBuffer;import org.springframework.http.server.reactive.ServerHttpResponse;import org.springframework.web.bind.annotation.GetMapping;import org.springframework.web.bind.annotation.RequestMapping;import org.springframework.web.bind.annotation.RequestParam;import org.springframework.web.bind.annotation.RestController;import reactor.core.publisher.Flux;@RestController @RequestMapping("/speech-test") public class SpeechSynthesisTestController { @Resource(name = "dashScopeSpeechSynthesisModel") private DashScopeAudioSpeechModel speechSynthesisModel; @GetMapping(value = "/synthesis", produces = "audio/mpeg") public Flux<DataBuffer> synthesizeSpeech (@RequestParam(defaultValue = "支付宝到账100元") String text, ServerHttpResponse response) { DashScopeAudioSpeechOptions options = DashScopeAudioSpeechOptions.builder() .model("cosyvoice-v2" ) .voice("longyingxiao" ) .speed(1.0 ) .build(); TextToSpeechPrompt prompt = new TextToSpeechPrompt (text, options); return speechSynthesisModel.stream(prompt) .map(chunk -> { byte [] audio = chunk.getResult().getOutput(); return response.bufferFactory().wrap(audio); }); } }
RAG 使用案例 这里基于 redis 8 实现。 redis 8 服务端环境准备可以参考本站 Langchan4j 社区版 redis ChatMemoryStore 进行安装。除此之外,我们还需要引入支持 redis RAG 的依赖包:
1 2 3 4 5 6 <dependency > <groupId > org.springframework.ai</groupId > <artifactId > spring-ai-starter-vector-store-redis</artifactId > <version > 1.1.8</version > </dependency >
注入 VectorStore,以及为 ChatClient 装配 VectorStore Advisor 切面。更新 SsaLLMConfig:
1 2 3 4 5 6 7 8 9 10 11 12 13 14 15 16 17 18 19 20 21 22 23 24 25 26 27 28 29 30 31 32 33 34 35 36 37 @Bean @Primary public VectorStore customRedisVectorStore (DashScopeEmbeddingModel embeddingModel) { JedisPooled jedisPooled = new JedisPooled ("127.0.0.1" , 6379 ); return RedisVectorStore.builder(jedisPooled, embeddingModel) .indexName(VectorDataInitializer.INDEX_NAME) .prefix(VectorDataInitializer.PREFIX) .embeddingFieldName(VectorDataInitializer.EMBEDDING_FIELD_NAME) .contentFieldName(VectorDataInitializer.CONTENT_FIELD_NAME) .initializeSchema(true ) .build(); } @Bean("deepseekChatClient") public ChatClient deepseekChatClient (@Qualifier("deepseekChatModel") ChatModel deepseekChatModel, ChatMemory chatMemory, VectorStore customRedisVectorStore) { return ChatClient.builder(deepseekChatModel) .defaultAdvisors( RetrievalAugmentationAdvisor .builder() .documentRetriever(VectorStoreDocumentRetriever .builder().vectorStore(customRedisVectorStore) .build()) .build(), new SimpleLoggerAdvisor ()) .build(); }
VectorDataInitializer:用于本地知识库的初始化(已去重)。
1 2 3 4 5 6 7 8 9 10 11 12 13 14 15 16 17 18 19 20 21 22 23 24 25 26 27 28 29 30 31 32 33 34 35 36 37 38 39 40 41 42 43 44 45 46 47 48 49 50 51 52 53 54 55 56 57 58 59 60 61 62 63 64 65 66 67 68 69 70 71 72 73 74 75 76 77 78 79 80 81 82 83 84 85 86 87 88 89 import lombok.extern.slf4j.Slf4j;import org.springframework.ai.document.Document;import org.springframework.ai.reader.TextReader;import org.springframework.ai.transformer.splitter.TokenTextSplitter;import org.springframework.ai.vectorstore.VectorStore;import org.springframework.ai.vectorstore.redis.RedisVectorStore;import org.springframework.beans.factory.annotation.Qualifier;import org.springframework.beans.factory.annotation.Value;import org.springframework.boot.CommandLineRunner;import org.springframework.stereotype.Component;import org.springframework.util.DigestUtils;import org.springframework.util.StringUtils;import redis.clients.jedis.JedisPooled;import java.nio.charset.StandardCharsets;import java.util.List;@Slf4j @Component public class VectorDataInitializer implements CommandLineRunner { public static final String INDEX_NAME = "owlias-rag-idx" ; public static final String PREFIX = "owlias:" ; public static final String EMBEDDING_FIELD_NAME = "embedding" ; public static final String CONTENT_FIELD_NAME = "content" ; private final VectorStore vectorStore; public VectorDataInitializer (@Qualifier("customRedisVectorStore") VectorStore vectorStore) { this .vectorStore = vectorStore; } @Value("classpath:rag/ops.txt") private org.springframework.core.io.Resource resource; @Override public void run (String... args) { try { log.info("============== [CommandLineRunner] 清扫旧数据 ==============" ); if (vectorStore instanceof RedisVectorStore) { JedisPooled jedis = (JedisPooled) vectorStore.getNativeClient().get(); var keys = jedis.keys(PREFIX + "*" ); if (keys != null && !keys.isEmpty()) { List<String> documentIds = keys.stream() .map(key -> key.substring(PREFIX.length())) .toList(); vectorStore.delete(documentIds); log.info("已成功通过 VectorStore 清理了 {} 条历史向量数据。" , documentIds.size()); } } log.info("============== [CommandLineRunner] 开始初始化 RAG 本地知识库 ==============" ); TextReader textReader = new TextReader (resource); List<Document> rawDocuments = textReader.get(); log.info("读取原始文档成功,共 {} 篇。" , rawDocuments.size()); TokenTextSplitter splitter = new TokenTextSplitter (); List<Document> splitDocuments = splitter.apply(rawDocuments); List<Document> deduplicatedDocuments = splitDocuments.stream() .filter(doc -> doc != null && StringUtils.hasText(doc.getText())) .map(doc -> { String contentMd5 = DigestUtils.md5DigestAsHex(doc.getText().getBytes(StandardCharsets.UTF_8)); return new Document (contentMd5, doc.getText(), doc.getMetadata()); }).toList(); log.info("文本切片完成,切分后生成 {} 个知识片段。" , deduplicatedDocuments.size()); vectorStore.accept(deduplicatedDocuments); log.info("============== RAG 本地知识库成功注入 Redis 向量库 ==============" ); } catch (Exception e) { log.error("初始化 RAG 知识库失败,请检查 redis 连接或存储路径!" , e); } } }
业务测试类:
1 2 3 4 5 6 7 8 9 10 11 12 13 14 15 16 17 18 19 20 21 @RestController @RequestMapping("/rag-test") public class RagTestController { @Resource @Qualifier("deepseekChatClient") private ChatClient chatClient; @GetMapping(value = "/chat", produces = MediaType.TEXT_PLAIN_VALUE) public Flux<String> ragTestChat (@RequestParam String code) { return chatClient.prompt() .system("你是一个运维工程师,按照编码给出对应的故障解释,否则回复找不到信息。" ) .user(code) .stream() .content(); } }
测试验证:
1 2 3 $ curl -N http://localhost:8080/rag-test/chat?code=编码0002的响应含义是什么 编码0002表示处理中。
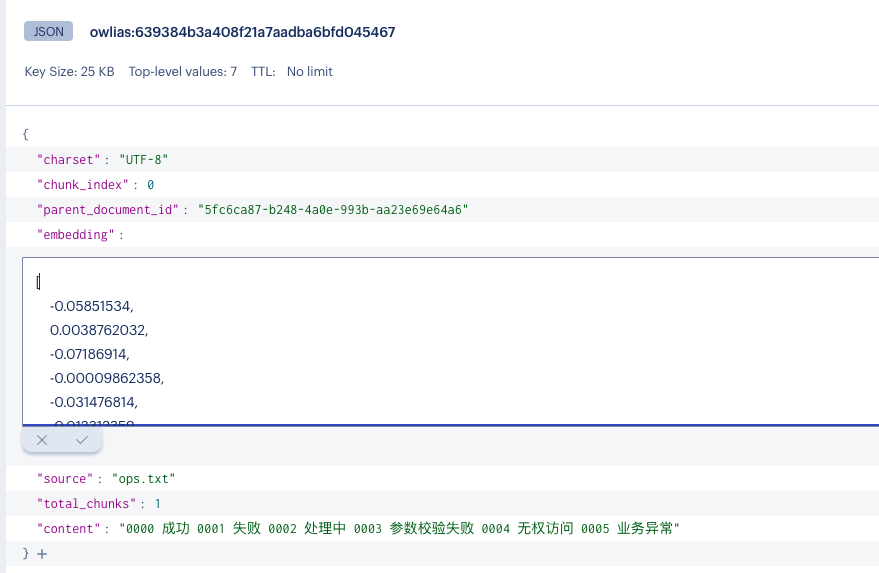
redis 的数据结构:
redis 的索引结构:
1 2 3 4 5 6 7 8 9 10 11 12 13 14 15 16 17 18 19 20 21 22 23 24 25 26 27 28 29 30 31 32 33 34 35 36 37 38 39 40 41 42 43 44 45 46 47 48 > FT.INFO owlias-rag-idx 1) "index_name" 2) "owlias-rag-idx" ... 5) "index_definition" ... 3) "prefixes" 4) 1) "owlias:" 5) "default_score" 6) "1" 7) "attributes" 8) 1) 1) "identifier" 2) "$.content" 3) "attribute" 4) "content" 5) "type" 6) "TEXT" 7) "WEIGHT" 8) "1" 2) 1) "identifier" 2) "$.embedding" 3) "attribute" 4) "embedding" 5) "type" 6) "VECTOR" 7) "algorithm" 8) "HNSW" 9) "data_type" 10) "FLOAT32" 11) "dim" 12) "1024" 13) "distance_metric" 14) "COSINE" 15) "M" 16) "16" 17) "ef_construction" 18) "200" 9) "num_docs" 10) "1" 11) "max_doc_id" 12) "12" ...
标题:
Spring AI Alibaba - 基础案例演示