搭建 netty 服务器基础版
引入依赖
1
2
3
4
5
6
7
8
9
10
| <dependencies>
<dependency>
<groupId>io.netty</groupId>
<artifactId>netty-all</artifactId>
</dependency>
<dependency>
<groupId>org.springframework.boot</groupId>
<artifactId>spring-boot-starter-web</artifactId>
</dependency>
</dependencies>
|
最简单的业务处理器
我们先写一个最简单的工人,它只干一件事:收到客户端发来的字符串,打印出来,并原样送回去。
1
2
3
4
5
6
7
8
9
10
11
12
13
14
15
16
17
18
19
20
21
22
23
24
25
26
27
| package com.owlias.mqtt.server.handler;
import io.netty.channel.ChannelHandlerContext;
import io.netty.channel.SimpleChannelInboundHandler;
import lombok.extern.slf4j.Slf4j;
@Slf4j
public class SimpleEchoHandler extends SimpleChannelInboundHandler<String> {
@Override
protected void channelRead0(ChannelHandlerContext ctx, String msg) throws Exception {
log.info("收到客户端消息:{}", msg);
ctx.writeAndFlush("服务端已收到:" + msg + "\n");
}
@Override
public void channelInactive(ChannelHandlerContext ctx) throws Exception {
log.info("客户端断开连接:{}", ctx.channel().remoteAddress() );
super.channelInactive(ctx);
}
@Override
public void exceptionCaught(ChannelHandlerContext ctx, Throwable cause) throws Exception {
log.error("发生异常", cause);
ctx.close();
}
}
|
配置并启动 NettyServer
组装配置类:
1
2
3
4
5
6
7
8
9
10
11
12
13
14
15
16
17
18
19
20
21
22
23
24
25
26
27
28
29
30
31
32
33
34
35
36
37
38
| @Slf4j
@Component
public class NettyServer {
private final EventLoopGroup bossGroup = new NioEventLoopGroup(1);
private final EventLoopGroup workerGroup = new NioEventLoopGroup();
@PostConstruct
public void start() throws InterruptedException {
ServerBootstrap bootstrap = new ServerBootstrap();
bootstrap.group(bossGroup, workerGroup)
.channel(NioServerSocketChannel.class)
.childHandler(new ChannelInitializer<SocketChannel>() {
@Override
protected void initChannel(SocketChannel ch) throws Exception {
ch.pipeline().addLast(new StringDecoder());
ch.pipeline().addLast(new StringEncoder());
ch.pipeline().addLast(new SimpleEchoHandler());
}
});
int port = 8888;
ChannelFuture future = bootstrap.bind(port).sync();
log.info(">>>> 我的第一个 Netty 服务器启动成功,监听端口: {} <<<<", port);
}
@PreDestroy
public void stop() {
bossGroup.shutdownGracefully();
workerGroup.shutdownGracefully();
log.info("Netty 服务器优雅关闭");
}
}
|
启动类:
1
2
3
4
5
6
| @SpringBootApplication
public class App {
public static void main(String[] args) {
SpringApplication.run(App.class);
}
}
|
启动你的 Spring Boot 应用程序。这时候,你不需要写前端客户端,直接打开你电脑的终端利用操作系统自带的 telnet 或 nc(Netcat)命令连接你的服务器:
让系统支持 MQTT
在上面,客户端发什么字符串,服务器就接什么字符串。但在实际的系统中,客户端和服务端通信必须是一套严密的、结构化的二进制协议。这里我们使用 MQTT 协议。
当客户端连上服务器时,它发出的第一个请求不能再是普通的文本,而必须是一个 MQTT CONNECT(请求连接)报文。里面包含了它的设备 ID、用户名和密码。服务器收到后,必须回一个 MQTT CONNACK(确认连接)报文,两边才算真正“握手成功”。
编写 MQTT 业务处理器
Netty 官方已经帮我们把 MQTT 的编解码器写好了(就在 netty-all 依赖里)。我们只需要把上面流水线上的 “String工人” 换成 “MQTT 工人” 即可。它的职责是专门拦截客户端发来的 MQTT CONNECT 消息,把里面的 ClientId(资产ID)、Username(用户)榨取出来,然后给客户端回一个 “允许连接” 的答复。
1
2
3
4
5
6
7
8
9
10
11
12
13
14
15
16
17
18
19
20
21
22
23
24
25
26
27
28
29
30
31
32
33
34
35
36
37
38
39
40
41
42
43
44
45
46
47
48
49
50
51
52
53
54
55
56
57
| package com.owlias.mqtt.server.handler;
import io.netty.channel.ChannelHandlerContext;
import io.netty.channel.SimpleChannelInboundHandler;
import io.netty.handler.codec.mqtt.*;
import lombok.extern.slf4j.Slf4j;
@Slf4j
public class MqttConnectHandler extends SimpleChannelInboundHandler<MqttMessage> {
@Override
protected void channelRead0(ChannelHandlerContext ctx, MqttMessage msg) throws Exception {
if (msg.fixedHeader().messageType() == MqttMessageType.CONNECT) {
MqttConnectMessage connectMessage = (MqttConnectMessage) msg;
String clientId = connectMessage.payload().clientIdentifier();
String username = connectMessage.payload().userName();
log.info(">>>> [MQTT网关] 收到客户端连接请求! ClientId(资产ID): {}, Username: {}", clientId, username);
MqttConnAckMessage connAckMessage = getMqttConnAckMessage();
ctx.writeAndFlush(connAckMessage);
log.info("<<<< [MQTT网关] 已向客户端发送握手成功响应 (CONNACK)");
} else {
log.info("收到非CONNECT类型的MQTT消息: {}", msg.fixedHeader().messageType());
}
}
private static MqttConnAckMessage getMqttConnAckMessage() {
MqttFixedHeader fixedHeader = new MqttFixedHeader(
MqttMessageType.CONNACK,
false,
MqttQoS.AT_MOST_ONCE,
false,
0
);
MqttConnAckVariableHeader variableHeader = new MqttConnAckVariableHeader(
MqttConnectReturnCode.CONNECTION_ACCEPTED,
false
);
MqttConnAckMessage connAckMessage = new MqttConnAckMessage(fixedHeader, variableHeader);
return connAckMessage;
}
@Override
public void exceptionCaught(ChannelHandlerContext ctx, Throwable cause) {
log.error("通道发生异常", cause);
ctx.close();
}
}
|
更新流水线
回到服务器配置类,把之前的 StringDecoder / StringEncoder 换成标准的 MqttDecoder 和 MqttEncoder,并换上我们刚写好的工厂工人:
1
2
3
4
5
6
7
8
9
10
11
12
13
| @Override
protected void initChannel(SocketChannel ch) {
ch.pipeline().addLast(new MqttDecoder());
ch.pipeline().addLast(MqttEncoder.INSTANCE);
ch.pipeline().addLast(new MqttConnectHandler());
}
|
因为 MQTT 协议传输的是复杂的二进制字节块,普通的终端命令 nc 或 telnet 没办法模拟发送标准的 MQTT 报文了。为了验证它,可以去官网下载一个免费的 MQTTX 客户端桌面软件(类似 Postman,专门调 MQTT 的)。
1
| wget from https://mqttx.app/downloads
|
连接池和心跳检测支持
现在,MQTTX 客户端显示“已连接”,但对服务器来说,握手完方法就结束了,服务器在内存里并没有把这个连接“存”下来。如果服务端想要主动给这个客户端发一条 “查杀病毒” 的指令,服务器根本找不到这个客户端的 “电话号码(Channel)”。所以,我们顺理成章地需要建立“生死簿”,管好海量连接。我们要完成的两个目标:
- 只要有客户端连进来,就必须把它登记在册,方便以后随时“反向推送”消息。
- 客户端断网、拔网线、或者装死,网关必须能在指定时间内(比如 10 秒没动静)自动断开死连接,释放服务器内存。
简易连接管理器
ServerConnectionManager
1
2
3
4
5
6
7
8
9
10
11
12
13
14
15
16
17
18
19
20
21
22
23
24
25
26
| @Slf4j
@Component
public class ServerConnectionManager {
private final ConcurrentHashMap<String, Channel> connectionPool = new ConcurrentHashMap<>();
public void addConnection(String clientId, Channel channel) {
connectionPool.put(clientId, channel);
log.info("【生死簿】登记新连接 -> 设备: {}, 当前在线总数: {}", clientId, connectionPool.size());
}
public void removeConnection(String clientId) {
if (clientId != null && connectionPool.containsKey(clientId)) {
connectionPool.remove(clientId);
log.warn("【生死簿】注销老连接 -> 设备: {}, 当前在线总数: {}", clientId, connectionPool.size());
}
}
public Channel getConnection(String clientId) {
return connectionPool.get(clientId);
}
}
|
将连接成功登记在册
1
2
3
4
5
6
7
8
9
10
11
12
13
14
15
16
17
18
19
20
21
22
23
24
25
26
27
28
29
30
31
32
33
34
35
36
37
38
39
40
41
42
43
44
45
46
47
48
49
50
51
52
53
54
55
56
57
58
59
60
61
62
63
64
65
66
67
68
69
70
71
| @Slf4j
@Component
@ChannelHandler.Sharable
public class MqttConnectHandler extends SimpleChannelInboundHandler<MqttMessage> {
@Resource
private ServerConnectionManager connectionManager;
public static final AttributeKey<String> ATTR_CLIENT_ID = AttributeKey.valueOf("clientId");
@Override
protected void channelRead0(ChannelHandlerContext ctx, MqttMessage msg) throws Exception {
if (msg.fixedHeader().messageType() == MqttMessageType.CONNECT) {
MqttConnectMessage connectMessage = (MqttConnectMessage) msg;
String clientId = connectMessage.payload().clientIdentifier();
String username = connectMessage.payload().userName();
log.info(">>>> [MQTT网关] 收到客户端连接请求! ClientId(资产ID): {}, Username: {}", clientId, username);
ctx.channel().attr(ATTR_CLIENT_ID).set(clientId);
connectionManager.addConnection(clientId, ctx.channel());
MqttConnAckMessage connAckMessage = getMqttConnAckMessage();
ctx.writeAndFlush(connAckMessage);
log.info("<<<< [MQTT网关] 已向客户端发送握手成功响应 (CONNACK)");
} else {
log.info("收到非CONNECT类型的MQTT消息: {},顺延给下一个Handler处理", msg.fixedHeader().messageType());
ReferenceCountUtil.retain(msg);
ctx.fireChannelRead(msg);
}
}
@Override
public void channelInactive(ChannelHandlerContext ctx) throws Exception {
String clientId = ctx.channel().attr(ATTR_CLIENT_ID).get();
connectionManager.removeConnection(clientId);
super.channelInactive(ctx);
}
private static MqttConnAckMessage getMqttConnAckMessage() {
MqttFixedHeader fixedHeader = new MqttFixedHeader(
MqttMessageType.CONNACK,
false,
MqttQoS.AT_MOST_ONCE,
false,
0
);
MqttConnAckVariableHeader variableHeader = new MqttConnAckVariableHeader(
MqttConnectReturnCode.CONNECTION_ACCEPTED,
false
);
MqttConnAckMessage connAckMessage = new MqttConnAckMessage(fixedHeader, variableHeader);
return connAckMessage;
}
@Override
public void exceptionCaught(ChannelHandlerContext ctx, Throwable cause) {
log.error("通道发生异常", cause);
ctx.close();
}
}
|
加入心跳检测支持
海量长连接最怕死连接(比如客户端断网了,但服务器没收到断开通知,连接一直占着堆内存)。我们必须引入心跳监控。原理是服务器盯着这个通道,如果比如 10 秒钟没读到任何客户端的数据,就触发超时,强制掐断。如果客户端想活着,就必须每隔几秒发一个 PINGREQ(心跳包),服务器收到心跳包后,可以给客户端续命,并回一个 PINGRESP 给客户端。
我们新建一个 HeartbeatHandler,用来抓取超时事件:
1
2
3
4
5
6
7
8
9
10
11
12
13
14
15
16
17
| @Slf4j
public class HeartbeatHandler extends ChannelInboundHandlerAdapter {
@Override
public void userEventTriggered(ChannelHandlerContext ctx, Object evt) throws Exception {
if (evt instanceof IdleStateEvent) {
IdleStateEvent event = (IdleStateEvent) evt;
if (event.state() == IdleState.READER_IDLE) {
log.warn("【心跳卫士】该连接已超过10秒无任何数据交互,确认为死连接,强制关闭!Channel: {}", ctx.channel().remoteAddress());
ctx.channel().close();
}
} else {
super.userEventTriggered(ctx, evt);
}
}
}
|
再新建一个心跳续命工人 MqttPingReqHandler,专门拦截客户端的 PINGREQ 心跳包:
1
2
3
4
5
6
7
8
9
10
11
12
13
14
15
16
17
18
19
20
| @Slf4j
@Component
@ChannelHandler.Sharable
public class MqttPingReqHandler extends SimpleChannelInboundHandler<MqttMessage> {
@Override
protected void channelRead0(ChannelHandlerContext ctx, MqttMessage msg) throws Exception {
if (msg.fixedHeader().messageType() == MqttMessageType.PINGREQ) {
log.info("【心跳卫士】收到客户端 PING 包,连接保持健康状态.");
MqttFixedHeader fixedHeader = new MqttFixedHeader(MqttMessageType.PINGRESP, false, MqttQoS.AT_MOST_ONCE, false, 0);
ctx.writeAndFlush(new MqttMessage(fixedHeader));
} else {
ReferenceCountUtil.retain(msg);
ctx.fireChannelRead(msg);
}
}
}
|
把新关卡组装进流水线
注意:由于 MqttConnectHandler 和 MqttPingReqHandler 现在加上了 @Component 并注入了依赖,请把 MyFirstNettyServer 里原本 new 这两个 Handler 的地方,改成用 @Resource 注入成员变量使用。
1
2
3
4
5
6
7
8
9
10
11
12
13
14
15
16
17
18
19
20
21
22
| @Resource
private MqttConnectHandler mqttConnectHandler;
@Resource
private MqttPingReqHandler mqttPingReqHandler;
@Override
protected void initChannel(SocketChannel ch) {
ch.pipeline().addLast(new IdleStateHandler(10, 0, 0));
ch.pipeline().addLast(new MqttDecoder());
ch.pipeline().addLast(MqttEncoder.INSTANCE);
ch.pipeline().addLast(mqttConnectHandler);
ch.pipeline().addLast(mqttPingReqHandler);
ch.pipeline().addLast(new HeartbeatHandler());
}
|
实现动态心跳机制
在真实的物联网场景中,不能在 NettyServer 里把心跳时间硬编码死。因为有的设备为了省电可能 60 秒发一次心跳,有的设备可能 10 秒发一次。为了充分利用 MQTT 协议的特性,在客户端发起 CONNECT 握手时,动态读取它自带的 Keep Alive 字段,然后动态替换 Netty 流水线里的超时检测器。
修改 NettyServer
给 IdleStateHandler 取一个固定的名字(比如 “idleStateHandler”),以便后续动态替换它。同时将默认的读超时改回一个较大的安全兜底值(如 120 秒):
1
2
3
4
5
6
7
8
9
10
11
12
13
|
@Override
protected void initChannel(SocketChannel ch) {
ch.pipeline().addLast("idleStateHandler", new IdleStateHandler(120, 0, 0));
ch.pipeline().addLast(new MqttDecoder());
ch.pipeline().addLast(MqttEncoder.INSTANCE);
ch.pipeline().addLast(mqttConnectHandler);
ch.pipeline().addLast(mqttPingReqHandler);
ch.pipeline().addLast(new HeartbeatHandler());
}
|
升级 MqttConnectHandler
在收到客户端 CONNECT 报文时,提取其内置的 keepAliveTimeSeconds(客户端期望的心跳频率),然后利用 Netty 的 pipeline().replace() 动态冲刷掉原有的 120 秒兜底器,替换为 1.5 x KeepAlive 的定制计时器。
1
2
3
4
5
6
7
8
9
10
11
12
13
14
15
16
17
18
19
20
21
22
23
24
25
26
27
28
29
30
31
32
33
34
35
36
37
38
39
40
41
42
| @Override
protected void channelRead0(ChannelHandlerContext ctx, MqttMessage msg) throws Exception {
if (msg.fixedHeader().messageType() == MqttMessageType.CONNECT) {
MqttConnectMessage connectMessage = (MqttConnectMessage) msg;
String clientId = connectMessage.payload().clientIdentifier();
String username = connectMessage.payload().userName();
log.info(">>>> [MQTT网关] 收到客户端连接请求! ClientId(资产ID): {}, Username: {}", clientId, username);
int clientKeepAlive = connectMessage.variableHeader().keepAliveTimeSeconds();
if (clientKeepAlive > 0) {
int serverIdleTimeout = (int) (clientKeepAlive * 1.5);
ctx.pipeline().replace("idleStateHandler", "idleStateHandler",
new IdleStateHandler(serverIdleTimeout, 0, 0));
log.info(">>>> [MQTT网关] 设备 {} 携带 KeepAlive = {} 秒,服务端已动态调整读超时判死阈值为 {} 秒",
clientId, clientKeepAlive, serverIdleTimeout);
} else {
log.info(">>>> [MQTT网关] 设备 {} 设置 KeepAlive 为 0 (永不超时),服务端保持默认 120 秒安全兜底", clientId);
}
ctx.channel().attr(ATTR_CLIENT_ID).set(clientId);
connectionManager.addConnection(clientId, ctx.channel());
MqttConnAckMessage connAckMessage = getMqttConnAckMessage();
ctx.writeAndFlush(connAckMessage);
log.info("<<<< [MQTT网关] 已向客户端发送握手成功响应 (CONNACK)");
} else {
log.info("收到非CONNECT类型的MQTT消息: {},顺延给下一个Handler处理", msg.fixedHeader().messageType());
ReferenceCountUtil.retain(msg);
ctx.fireChannelRead(msg);
}
}
|
微调 HeartbeatHandler
因为心跳时间已经变成了动态自适应的(可能 15 秒、90 秒甚至根据设备而异),我们把原来的硬编码日志 “该连接已超过10秒…” 改为更通用的动态描述:
1
2
3
4
5
6
7
8
9
10
11
12
13
14
15
16
17
18
19
| @Slf4j
public class HeartbeatHandler extends ChannelInboundHandlerAdapter {
@Override
public void userEventTriggered(ChannelHandlerContext ctx, Object evt) throws Exception {
if (evt instanceof IdleStateEvent) {
IdleStateEvent event = (IdleStateEvent) evt;
if (event.state() == IdleState.READER_IDLE) {
log.warn("【心跳卫士】该连接已超过预设的 1.5 倍心跳周期无任何数据交互,确认为死连接,强制关闭!Channel: {}",
ctx.channel().remoteAddress());
ctx.channel().close();
}
} else {
super.userEventTriggered(ctx, evt);
}
}
}
|
支持 SSL 双向认证
准备证书
第一步:创建私有 CA (根证书)。这是信任链的源头,我们要生成 CA 的私钥和根证书。
1
2
3
4
5
|
openssl genrsa -out ca.key 4096
openssl req -new -x509 -days 3650 -key ca.key -out ca.crt -subj "/CN=Koohub-Root-CA"
|
第二步:生成服务端证书 (Server Certificate)。为了满足你的 CN=Koohub 需求,并解决浏览器/客户端校验问题,我们需要创建一个包含 subjectAltName 的服务端证书。
1
2
3
4
5
6
7
8
9
10
11
|
openssl genrsa -out server.key 2048
openssl req -new -key server.key -out server.csr -subj "/CN=Koohub"
openssl x509 -req -days 365 -in server.csr -CA ca.crt -CAkey ca.key -CAcreateserial -out server.crt -extensions v3_req -extfile <(printf "[v3_req]\nsubjectAltName=DNS:Koohub,IP:127.0.0.1")
openssl pkcs8 -topk8 -inform PEM -outform PEM -in server.key -out server_pkcs8.key -nocrypt
|
第三步:生成客户端证书 (Client Certificate)。这是你发给张三或者其他设备使用的证书,服务端会用第一步生成的 ca.crt 来校验它。
1
2
3
4
5
6
7
8
9
10
11
|
openssl genrsa -out client.key 2048
openssl req -new -key client.key -out client.csr -subj "/CN=zhangsan@koohub.com"
openssl x509 -req -days 365 -in client.csr -CA ca.crt -CAkey ca.key -CAcreateserial -out client.crt
openssl pkcs12 -export -in client.crt -inkey client.key -out zhangsan@koohub.com.p12 -name "zhangsan"
|
编写 SSL 工厂类
1
2
3
4
5
6
7
8
9
10
11
12
13
14
15
16
17
18
19
20
21
22
23
24
25
26
27
28
29
30
31
32
33
34
35
36
37
38
39
40
41
42
43
44
45
46
| import io.netty.handler.ssl.ClientAuth;
import io.netty.handler.ssl.SslContext;
import io.netty.handler.ssl.SslContextBuilder;
import io.netty.handler.ssl.SslHandler;
import jakarta.annotation.PostConstruct;
import lombok.extern.slf4j.Slf4j;
import org.springframework.core.io.ClassPathResource;
import org.springframework.stereotype.Component;
import java.io.InputStream;
@Slf4j
@Component
public class SslHandlerFactory {
private SslContext sslContext;
@PostConstruct
public void initSslContext() {
try {
InputStream serverCert = new ClassPathResource("certs/server.crt").getInputStream();
InputStream serverKey = new ClassPathResource("certs/server_pkcs8.key").getInputStream();
InputStream rootCa = new ClassPathResource("certs/ca.crt").getInputStream();
this.sslContext = SslContextBuilder.forServer(serverCert, serverKey)
.trustManager(rootCa)
.clientAuth(ClientAuth.REQUIRE)
.build();
log.info(">>>> 双向 SSL (mTLS) 上下文初始化成功 <<<<");
} catch (Exception e) {
log.error("SSL 上下文初始化失败", e);
}
}
public SslHandler createSslHandler(io.netty.buffer.ByteBufAllocator allocator) {
if (sslContext == null) {
throw new IllegalStateException("SSL Context 未正确初始化");
}
return sslContext.newHandler(allocator);
}
}
|
将认证插到流水线最前端
1
2
3
4
5
6
7
8
9
10
11
12
13
14
15
16
17
| @Resource
private SslHandlerFactory sslHandlerFactory;
@Override
protected void initChannel(SocketChannel ch) {
ch.pipeline().addLast(sslHandlerFactory.createSslHandler(ch.alloc()));
ch.pipeline().addLast("idleStateHandler", new IdleStateHandler(120, 0, 0));
ch.pipeline().addLast(new MqttDecoder());
ch.pipeline().addLast(MqttEncoder.INSTANCE);
ch.pipeline().addLast(mqttConnectHandler);
ch.pipeline().addLast(mqttPingReqHandler);
ch.pipeline().addLast(new HeartbeatHandler());
}
|
至此,你的代码就在 TCP 握手之后、MQTT CONNECT 发生之前,强制加了一层物理级的证书校验。如果没有合法的客户端证书,恶意设备连 TCP 握手都完不成,瞬间就会被 SslHandler 掐断。
测试验证
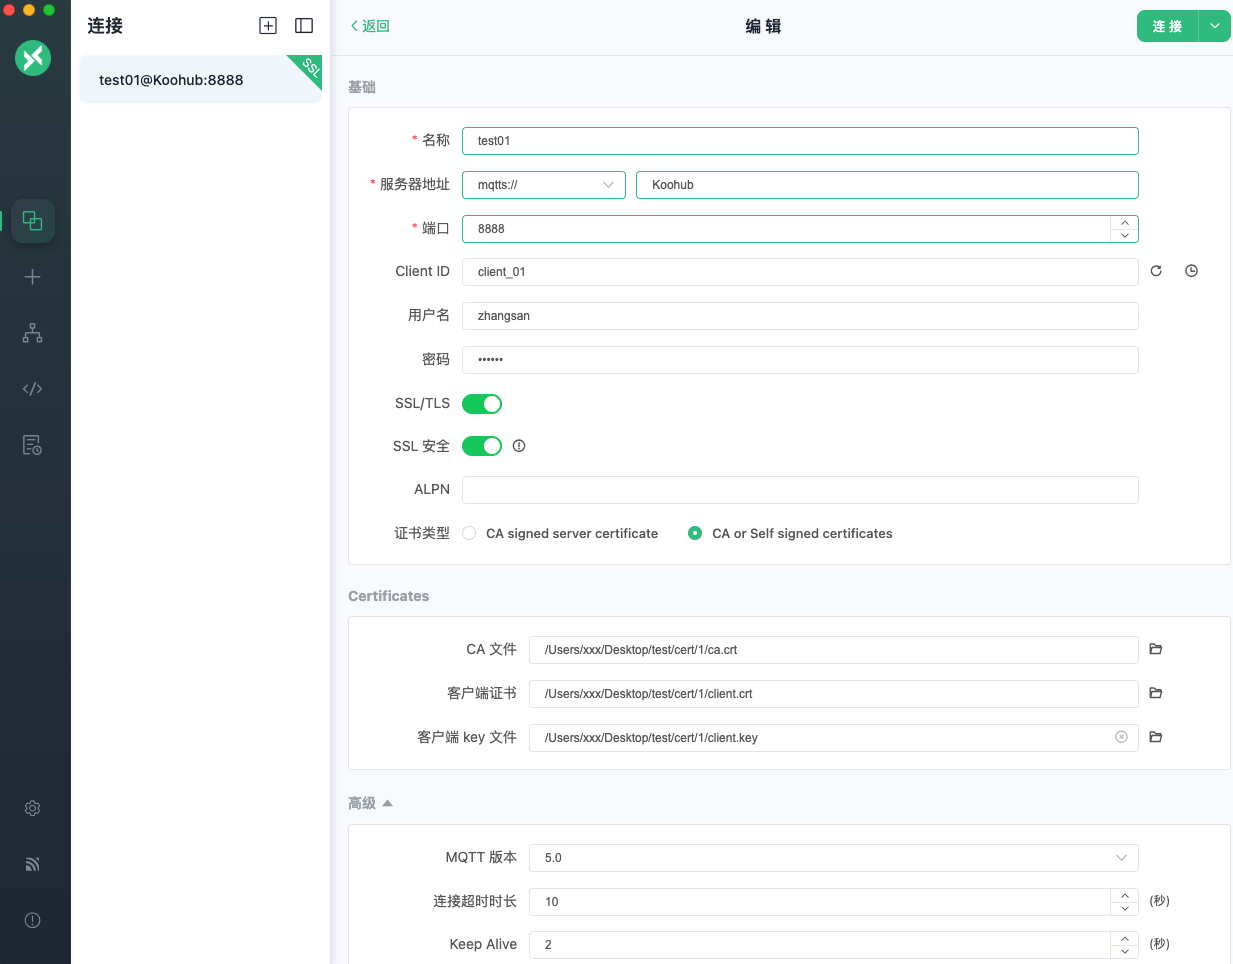
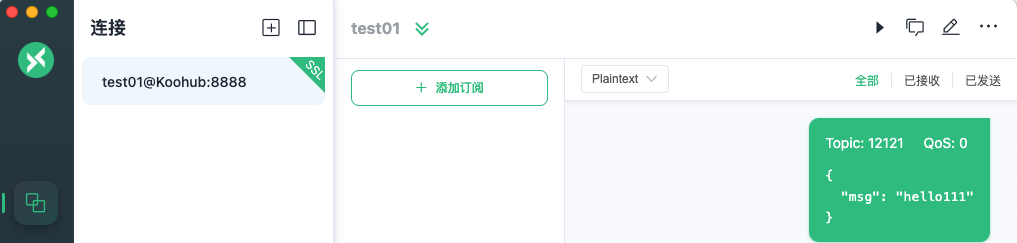
启动服务端。客户端 MQTTX 的设置:
- 在 SSL/TLS 配置中,勾选 SSL安全。
- CA File: 上传 ca.crt。
- Client Certificate File: 上传 client.crt。
- Client Key File: 上传 client.key (这里可以是原始的 client.key)。
- 最后注意,由于要进行双向验证(不仅服务端验证客户端,客户端也要验服务端),这里的服务地址必须得写 server 证书签发时候的域名 Koohub!
支持 token 认证校验
在现有的双向 SSL (mTLS) 基础之上加入 Token 验证,是生产环境中最常见的安全组合:TLS 负责传输层身份验证,Token 负责应用层授权与鉴权。MQTT 协议中,userName 和 password 字段最常用于放置身份鉴权信息。如果 Token 较长,建议使用 password 字段传输。
由于 MQTT 是在 CONNECT 包中进行身份验证的,我们需要在 MqttConnectHandler 中从 password 字段提取 Token 并进行校验。MQTT 协议本身不支持在连接过程中动态刷新 Token。如果 Token 过期,通常的做法是服务端在检测到 Token 过期后,主动断开该连接 (ctx.close()),强制客户端使用新 Token 重新发起 CONNECT 请求。
- 第一层 (TLS 层): 已经通过配置的 ca.crt 保证了只有持有合法证书的客户端才能建立 TCP 连接。
- 第二层 (Token 层): 在 MQTT 握手阶段通过 CONNECT 包校验用户身份,确保连接到系统的用户是合法的业务用户。
修改 MqttConnectHandler:
1
2
3
4
5
6
7
8
9
10
11
12
13
14
15
16
17
18
19
20
21
22
23
24
25
26
27
28
29
30
31
32
33
34
35
36
37
38
39
40
41
42
43
44
45
46
47
48
49
50
51
52
53
54
55
56
57
58
59
60
61
62
63
64
65
66
67
68
69
70
71
72
73
74
75
76
77
78
79
80
81
82
83
84
85
86
87
88
89
90
91
92
93
94
95
96
97
98
99
100
101
| @Slf4j
@Component
@ChannelHandler.Sharable
public class MqttConnectHandler extends SimpleChannelInboundHandler<MqttMessage> {
@Resource
private ServerConnectionManager connectionManager;
public static final AttributeKey<String> ATTR_CLIENT_ID = AttributeKey.valueOf("clientId");
@Override
protected void channelRead0(ChannelHandlerContext ctx, MqttMessage msg) throws Exception {
if (msg.fixedHeader().messageType() == MqttMessageType.CONNECT) {
MqttConnectMessage connectMessage = (MqttConnectMessage) msg;
String clientId = connectMessage.payload().clientIdentifier();
String username = connectMessage.payload().userName();
byte[] passwordBytes = connectMessage.payload().passwordInBytes();
String token = (passwordBytes != null) ? new String(passwordBytes, StandardCharsets.UTF_8) : null;
log.info(">>>> [MQTT网关] 收到客户端连接请求! ClientId: {}, Username: {}, tokenLen:{}", clientId, username, token==null ? 0 : token.length());
if (!isValidToken(token)) {
log.warn(">>>> [MQTT网关] Token 校验失败,拒绝连接! ClientId: {}", clientId);
sendConnAck(ctx, MqttConnectReturnCode.CONNECTION_REFUSED_BAD_USER_NAME_OR_PASSWORD);
ctx.close();
return;
}
int clientKeepAlive = connectMessage.variableHeader().keepAliveTimeSeconds();
if (clientKeepAlive > 0) {
int serverIdleTimeout = (int) (clientKeepAlive * 1.5);
ctx.pipeline().replace("idleStateHandler", "idleStateHandler",
new IdleStateHandler(serverIdleTimeout, 0, 0));
log.info(">>>> [MQTT网关] 设备 {} 携带 KeepAlive = {} 秒,服务端已动态调整读超时判死阈值为 {} 秒",
clientId, clientKeepAlive, serverIdleTimeout);
} else {
log.info(">>>> [MQTT网关] 设备 {} 设置 KeepAlive 为 0 (永不超时),服务端保持默认 120 秒安全兜底", clientId);
}
ctx.channel().attr(ATTR_CLIENT_ID).set(clientId);
connectionManager.addConnection(clientId, ctx.channel());
sendConnAck(ctx, MqttConnectReturnCode.CONNECTION_ACCEPTED);
MqttConnAckMessage connAckMessage = getMqttConnAckMessage();
ctx.writeAndFlush(connAckMessage);
log.info("<<<< [MQTT网关] 已向客户端发送握手成功响应 (CONNACK)");
} else if (msg.fixedHeader().messageType() == MqttMessageType.PUBLISH) {
MqttPublishMessage pubMsg = (MqttPublishMessage) msg;
String topic = pubMsg.variableHeader().topicName();
String content = pubMsg.payload().toString(CharsetUtil.UTF_8);
log.info(">>>> [MQTT消息接收] 收到新消息!Topic: {}, 内容: {}", topic, content);
ReferenceCountUtil.retain(msg);
ctx.fireChannelRead(msg);
} else {
log.info("收到非CONNECT类型的MQTT消息: {},顺延给下一个Handler处理", msg.fixedHeader().messageType());
ReferenceCountUtil.retain(msg);
ctx.fireChannelRead(msg);
}
}
private boolean isValidToken(String token) {
return token != null && token.startsWith("owlias");
}
private void sendConnAck(ChannelHandlerContext ctx, MqttConnectReturnCode returnCode) {
MqttFixedHeader fixedHeader = new MqttFixedHeader(MqttMessageType.CONNACK, false, MqttQoS.AT_MOST_ONCE, false, 0);
MqttConnAckVariableHeader variableHeader = new MqttConnAckVariableHeader(returnCode, false);
ctx.writeAndFlush(new MqttConnAckMessage(fixedHeader, variableHeader));
}
@Override
public void channelInactive(ChannelHandlerContext ctx) throws Exception {
String clientId = ctx.channel().attr(ATTR_CLIENT_ID).get();
connectionManager.removeConnection(clientId);
super.channelInactive(ctx);
}
private static MqttConnAckMessage getMqttConnAckMessage() {
MqttFixedHeader fixedHeader = new MqttFixedHeader(
MqttMessageType.CONNACK,
false,
MqttQoS.AT_MOST_ONCE,
false,
0
);
MqttConnAckVariableHeader variableHeader = new MqttConnAckVariableHeader(
MqttConnectReturnCode.CONNECTION_ACCEPTED,
false
);
MqttConnAckMessage connAckMessage = new MqttConnAckMessage(fixedHeader, variableHeader);
return connAckMessage;
}
@Override
public void exceptionCaught(ChannelHandlerContext ctx, Throwable cause) {
log.error("通道发生异常", cause);
ctx.close();
}
}
|
服务端主动给客户端下发消息
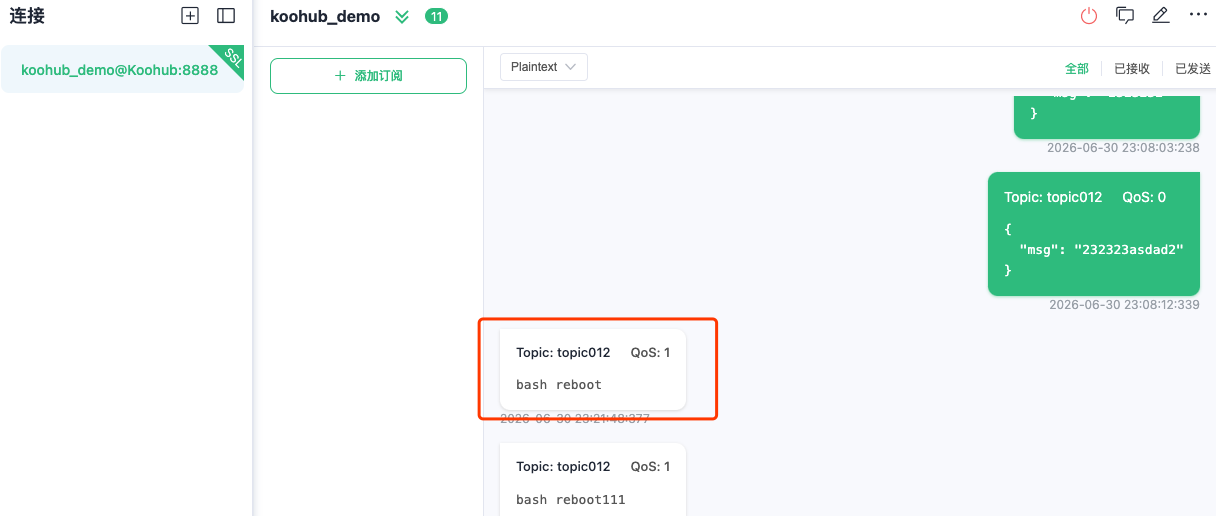
在 Netty 和 MQTT 架构中,实现 “从服务器主动向特定客户端下发消息” 的核心在于利用 ServerConnectionManager 维护的连接池。既然你已经有了一个管理连接的组件,实现思路如下:
- 获取 Channel:通过 ServerConnectionManager 根据 clientId 获取该设备的 Channel。
- 构建 MQTT PUBLISH 消息:使用 Netty 的 MqttMessageFactory 构建一个 MQTT 协议标准的 PUBLISH 包。
- 写入通道:调用 channel.writeAndFlush() 将消息发送出去。
创建一个 MqttPushService 来专门处理推送业务。下面代码使用的是 MqttQoS.AT_MOST_ONCE (QoS 0,即“至多一次”)。如果控制指令非常关键(不能丢失),建议改为 MqttQoS.AT_LEAST_ONCE (QoS 1),并在 Netty 中处理对应的 PUBACK 确认逻辑。
1
2
3
4
5
6
7
8
9
10
11
12
13
14
15
16
17
18
19
20
21
22
23
24
25
26
27
28
29
30
31
32
33
34
35
36
37
38
39
40
41
42
43
44
45
| @Slf4j
@Service
public class MqttPushService {
@Resource
private ServerConnectionManager connectionManager;
public void pushCommand(String clientId, String topic, String content) {
Channel channel = connectionManager.getConnection(clientId);
if (channel == null || !channel.isActive()) {
log.warn(">>>> [推送失败] 设备 {} 不在线,无法下发指令", clientId);
return;
}
MqttFixedHeader fixedHeader = new MqttFixedHeader(
MqttMessageType.PUBLISH, false, MqttQoS.AT_MOST_ONCE, false, 0);
MqttPublishVariableHeader variableHeader = new MqttPublishVariableHeader(topic, 0);
ByteBuf payload = Unpooled.copiedBuffer(content, StandardCharsets.UTF_8);
MqttPublishMessage message = new MqttPublishMessage(fixedHeader, variableHeader, payload);
channel.writeAndFlush(message).addListener(future -> {
if (future.isSuccess()) {
log.info(">>>> [推送成功] 已向设备 {} 下发指令: {}", clientId, content);
} else {
log.error(">>>> [推送异常] 向设备 {} 下发指令失败", clientId, future.cause());
}
});
}
}
|
新建一个测试 controller:
1
2
3
4
5
6
7
8
9
10
11
12
13
14
15
16
17
18
19
20
21
22
23
24
25
26
27
28
29
30
31
32
33
34
35
36
37
38
39
40
41
| Protobuf 序列化后只占用大约 14 字节。
@Slf4j
@RestController
@RequestMapping("/api/mqtt/device")
public class MqttDeviceController {
@Resource
private MqttPushService mqttPushService;
@PostMapping("/push")
public ResponseEntity<String> pushCommand(@RequestBody PushRequest request) {
log.info(">>>> [API接口] 收到下发请求: clientId={}, topic={}", request.getClientId(), request.getTopic());
try {
mqttPushService.pushCommand(request.getClientId(), request.getTopic(), request.getContent());
return ResponseEntity.ok("指令下发请求已受理");
} catch (Exception e) {
log.error(">>>> [API接口] 下发指令异常", e);
return ResponseEntity.internalServerError().body("下发失败: " + e.getMessage());
}
}
@Data
public static class PushRequest {
private String clientId;
private String topic;
private String content;
}
}
|
使用 protobuf 下发消息
为什么要用 protobuf
在物联网(IoT)和高并发网关的场景下,把原有的 JSON/纯文本改为 Protobuf 下发消息,核心原因可以总结为四个字:小、快、省、严。
- 比如同样是下发一条指令:{“cmd_id”:”1001”,”action”:”reboot”},JSON 占用约 37 字节,而 Protobuf 序列化后只占用大约 14 字节。数据量缩减了 60% 以上。在百万级设备在线的网关中,这能瞬间挤出大量的带宽,直接降低运营商网络带宽成本。
- 机器去解析 JSON 文本时,需要进行大量的字符串匹配、词法分析和内存分配。频繁的 JSON 文本解析会疯狂吃 CPU,并引发 JVM 的频繁垃圾回收(GC)。而 Protobuf 是直接在二进制位(Bit/Byte)上进行按位读取,几乎是底层内存的高速复制,完全不需要进行字符串复杂的比对和转换。其反序列化速度比 JSON 快 5 到 10 倍,大幅释放了服务端的 CPU 压力。
具体做法
新增protobuf模块
依赖配置:
1
2
3
4
5
6
7
8
9
10
11
12
13
14
15
16
17
18
19
20
21
22
23
24
25
26
27
28
29
30
31
32
33
34
35
36
37
38
39
40
41
42
43
44
45
46
47
48
49
50
51
52
53
54
55
56
57
58
59
60
61
62
63
64
65
66
67
68
69
70
71
72
73
74
75
76
77
78
79
| <?xml version="1.0" encoding="UTF-8"?>
<project xmlns="http://maven.apache.org/POM/4.0.0"
xmlns:xsi="http://www.w3.org/2001/XMLSchema-instance"
xsi:schemaLocation="http://maven.apache.org/POM/4.0.0 http://maven.apache.org/xsd/maven-4.0.0.xsd">
<modelVersion>4.0.0</modelVersion>
<parent>
<groupId>com.owlias</groupId>
<artifactId>owlias-mqtt</artifactId>
<version>1.0-SNAPSHOT</version>
</parent>
<artifactId>mqtt-protobuf</artifactId>
<dependencies>
<dependency>
<groupId>com.google.protobuf</groupId>
<artifactId>protobuf-java</artifactId>
<version>3.5.1</version>
</dependency>
<dependency>
<groupId>com.google.protobuf</groupId>
<artifactId>protobuf-java-util</artifactId>
<version>3.5.1</version>
</dependency>
<dependency>
<groupId>io.grpc</groupId>
<artifactId>grpc-core</artifactId>
<version>1.5.0</version>
<scope>compile</scope>
</dependency>
<dependency>
<groupId>io.grpc</groupId>
<artifactId>grpc-netty</artifactId>
<version>1.5.0</version>
<scope>compile</scope>
<exclusions>
<exclusion>
<artifactId>netty-codec-http2</artifactId>
<groupId>io.netty</groupId>
</exclusion>
</exclusions>
</dependency>
</dependencies>
<build>
<extensions>
<extension>
<groupId>kr.motd.maven</groupId>
<artifactId>os-maven-plugin</artifactId>
<version>1.6.0</version>
</extension>
</extensions>
<plugins>
<plugin>
<groupId>org.xolstice.maven.plugins</groupId>
<artifactId>protobuf-maven-plugin</artifactId>
<version>0.5.0</version>
<configuration>
<protocArtifact>
com.google.protobuf:protoc:3.1.0:exe:${os.detected.classifier}
</protocArtifact>
<pluginId>grpc-java</pluginId>
<pluginArtifact>
io.grpc:protoc-gen-grpc-java:1.11.0:exe:${os.detected.classifier}
</pluginArtifact>
</configuration>
<executions>
<execution>
<goals>
<goal>compile</goal>
<goal>compile-custom</goal>
</goals>
</execution>
</executions>
</plugin>
</plugins>
</build>
</project>
|
定义 Protobuf 文件 (src/main/proto/MyCommand.proto)。在项目中创建该文件。Maven 插件会自动读取该目录下的文件并生成代码。
1
2
3
4
5
6
7
8
9
10
11
12
| syntax = "proto3";
package com.owlias.mqtt.proto;
option java_package = "com.owlias.mqtt.proto";
option java_outer_classname = "MyCommand";
message DeviceCommand {
string cmdId = 1;
string action = 2;
int32 priority = 3;
map<string, string> params = 4;
}
|
编译与生成:在项目根目录运行 mvn compile,插件会自动在 target/generated-sources/protobuf/java 下生成 CommandProto.java 文件。记得在 IDE 中将生成的目录标记为 “Generated Sources Root”,这样你就可以在代码中直接导入 com.owlias.mqtt.proto.MyCommand 了。
使用 protobuf
在 mqtt-server 模块中引入依赖:
1
2
3
4
5
6
|
<dependency>
<groupId>com.owlias</groupId>
<artifactId>mqtt-protobuf</artifactId>
<version>${project.version}</version>
</dependency>
|
新增 controller 测试方法:
1
2
3
4
5
6
7
8
9
10
11
12
13
14
15
16
17
18
19
20
21
22
23
24
25
26
| @Slf4j
@RestController
@RequestMapping("/api/mqtt/device")
public class MqttDeviceController {
@Resource
private MqttPushService mqttPushService;
@PostMapping("/push2")
public ResponseEntity<String> pushCommand2() {
try {
MyCommand.DeviceCommand cmd = MyCommand.DeviceCommand.newBuilder()
.setCmdId("1001")
.setAction("reboot")
.setPriority(121)
.putParams("delay", "5")
.putParams("expire", "10")
.build();
mqttPushService.pushCommand("mqttx_0d913469", "topic012", cmd);
return ResponseEntity.ok("指令下发请求已受理");
} catch (Exception e) {
log.error(">>>> [API接口] 下发指令异常", e);
return ResponseEntity.internalServerError().body("下发失败: " + e.getMessage());
}
}
}
|
对应的 service:
1
2
3
4
5
6
7
8
9
10
11
12
13
14
15
16
17
18
19
20
21
22
23
24
25
26
27
28
29
30
31
32
33
34
35
36
37
38
39
| @Slf4j
@Service
public class MqttPushService {
@Resource
private ServerConnectionManager connectionManager;
public void pushCommand(String clientId, String topic, Message message) {
Channel channel = connectionManager.getConnection(clientId);
if (channel == null || !channel.isActive()) {
log.warn(">>>> [Protobuf推送] 设备 {} 不在线", clientId);
return;
}
byte[] protoBytes = message.toByteArray();
MqttFixedHeader fixedHeader = new MqttFixedHeader(
MqttMessageType.PUBLISH, false, MqttQoS.AT_MOST_ONCE, false, 0);
MqttPublishVariableHeader variableHeader = new MqttPublishVariableHeader(topic, 0);
ByteBuf payload = Unpooled.wrappedBuffer(protoBytes);
MqttPublishMessage mqttMsg = new MqttPublishMessage(fixedHeader, variableHeader, payload);
channel.writeAndFlush(mqttMsg).addListener(future -> {
if (future.isSuccess()) {
log.info(">>>> [Protobuf推送] 成功发送指令到 {}", clientId);
}
});
}
}
|
标题:
Java NIO - Netty 支持 mqtt消息、SSL证书双向认证、token、以及服务端主动下发消息的测试案例