什么是事务?
事务的定义:事务是数据库管理系统(DBMS)执行过程中的一个逻辑单位,由一个或多个数据库操作(通常是 SQL 语句)序列组成。这些操作要么全部执行成功,要么全部撤销(回滚),它使数据库从一种一致性状态变更为另一种一致性状态。事务有四个最基本的特性,即所谓的 ACID,以最经典的转账业务为例:
原子性 (Atomicity) —— “要么全成,要么全败”
业务场景:转账包含两步:A 扣钱,B 加钱。
- 代码体现:如果在 A 扣钱成功后,程序抛出了异常(比如金额过大),Spring 会捕捉到这个异常并通知数据库 Rollback(回滚)。
- 结果:数据库会撤销 A 扣钱的操作。在外界看来,这两步操作就像一个不可分割的 “原子”,不存在 “A 扣了钱但 B 没收到” 的中间状态。
一致性 (Consistency) —— “能量守恒”
业务场景:转账前后,系统必须处于一个合法的合规状态。
- 代码体现:我们使用了 “ge(Account::getBalance, amount)”。
- 结果:一致性保证了数据库完整性约束。如果 A 只有 100 元却想转 200 元,SQL 检查失败,result 为 0,我们抛出异常触发回滚。
- 宏观视角:转账前 A+B 的总额是 1000 元,转账后无论成功还是失败,A+B 的总额必须依然是 1000 元,钱不会凭空消失或产生。
隔离性 (Isolation) —— “互不干扰”
业务场景:当张三给李四转账的同时,王五也给李四转账。
- 代码体现:这是由数据库(如 MySQL)的隔离级别(默认通常是 Repeatable Read)和锁机制保证的。
- 结果:当我们的 update 语句执行时,MySQL 会给对应的行加排他锁(X锁)。
- 直观感受:即使有 100 个线程同时改李四的余额,数据库也会让它们 “排队” 执行,确保每一个事务读取到的余额都是准确的,不会产生 “脏读” 或 “覆盖更新”。
持久性 (Durability) —— “落盘为安”
业务场景:转账成功的一瞬间,银行大楼突然断电。
- 底层体现:一旦 transfer 方法执行完毕,Spring 提交了事务,MySQL 会确保数据已经写入了 Redo Log(重做日志) 并刷入磁盘。
- 结果:哪怕数据库服务器下一秒就炸了,重启后通过日志恢复,张三扣掉的钱和李四增加的钱依然存在。
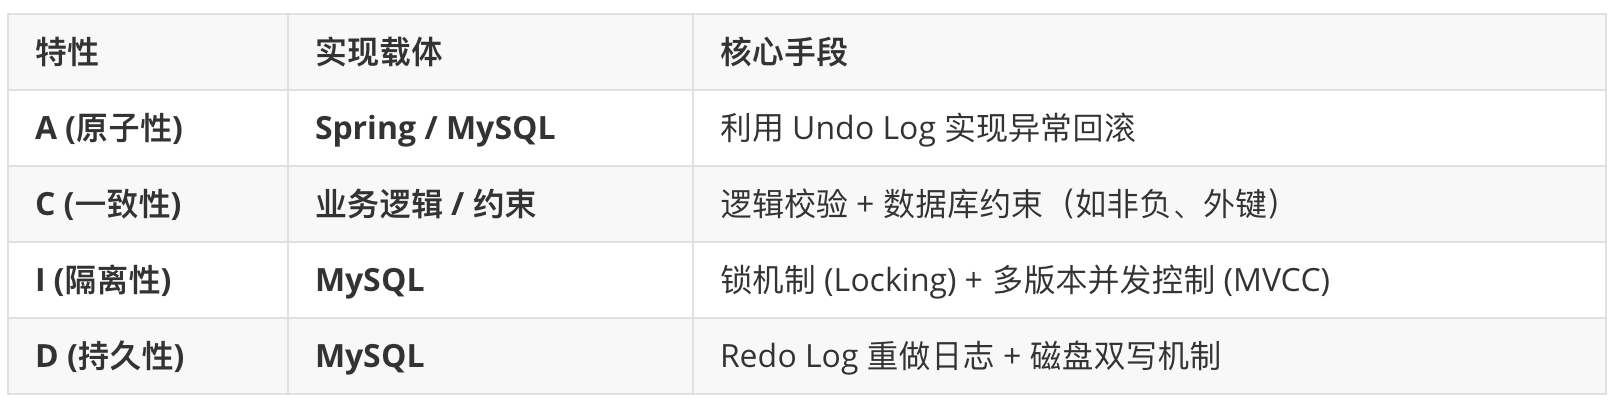
以上四个特性,C 一致性才是真正的目的,A、I、D 只是手段。 我们之所以追求原子性、隔离性和持久性,最终都是为了保证数据库里的数据是准确一致的。
事务的隔离级别
事务的隔离性是为了解决多个线程同时操作同一份数据时产生的 “打架” 问题,它本质上是数据库引擎(如 MySQL 的 InnoDB)层面的实现。Spring 的 @Transactional 只是一个“遥控器”,只负责把你的指令发送给数据库,真正去锁表、去记录版本、去排队的,全是底层的数据库引擎。
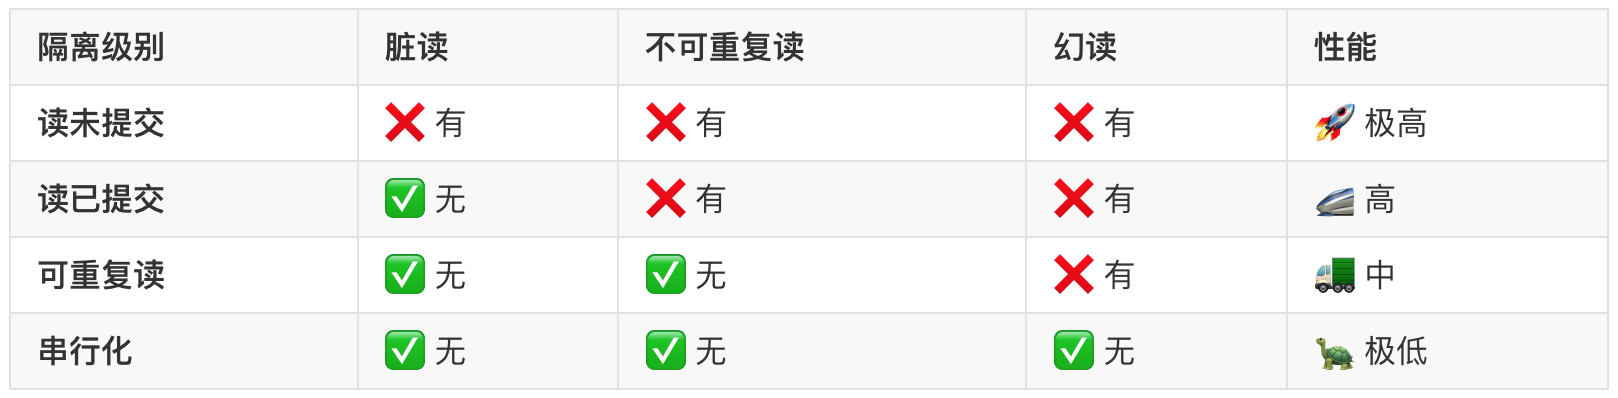
为了平衡性能与安全,SQL 标准定义了 4 种隔离级别。我们可以用 “防偷窥、防干扰” 的程度来通俗理解:
读未提交 (Read Uncommitted):
- 可以理解成 “草稿可见”,别人正在改的数据,哪怕还没存盘(Commit),你也能看到。
- 底层机制:数据库不对读操作加任何锁。
- 存在脏读现象。比如小王给李四转账 500 元(还没点确定),李四查账发现多了 500 元,结果小王取消了转账。李四看到的就是“脏”数据。
- 安全等级最低,几乎不用。
读已提交 (Read Committed)
- 可以理解成 “盖章后可见”。只有别人正式存盘(Commit)的数据,你才能查到。
- 底层机制:采用 MVCC(多版本并发控制)。在每次执行 select 语句时,数据库都会生成一个新的快照(Read View)。
- 解决了脏读,但存在不可重复读的问题。比如你正在查工资,第一次查是 5000 元;这时财务改成了 6000 元并点提交;你再点一次刷新,变成了 6000 元。同一次事务里,两次读的结果不一样。
- 这是 Oracle、SQL Server 的默认级别。
可重复读 (Repeatable Read)
- 只要事务一开启,我看到的数据就定格在这一刻。无论别人怎么改并提交,我查到的永远是一开始的样子,就像给数据拍了个快照一样,同一个事务之内,看到的数据总是一样的。
- 底层机制:同样使用 MVCC,但与 RC 不同,它在事务开始后的第一条查询时生成快照,并在整个事务期间一直复用这个快照。
- 解决了不可重复读,但在标准的 SQL 定义中它无法解决幻读。比如你查账户列表有 10 个人,这时别人新增加了一个人。你虽然查不到这个人,但你尝试创建一个同名账户时却提示 “已存在”,就像见鬼了(幻觉)一样。
- 这是MySQL 的默认级别(MySQL 通过间隙锁解决了大部分幻读)。
串行化 (Serializable)
- 所有的事务必须一个一个排队执行。如果你在读这行数据,别人连改的权利都没有,必须等你读完。
- 底层机制:数据库会对读取的每一行数据都自动加上共享锁(S-Lock)。如果此时有其他事务尝试修改这些数据,必须等待当前事务释放锁。
- 存在性能很差的问题,因为完全没有并发可言。
- 安全等级最高,仅用于对安全性要求变态的场景。
本地事务的含义
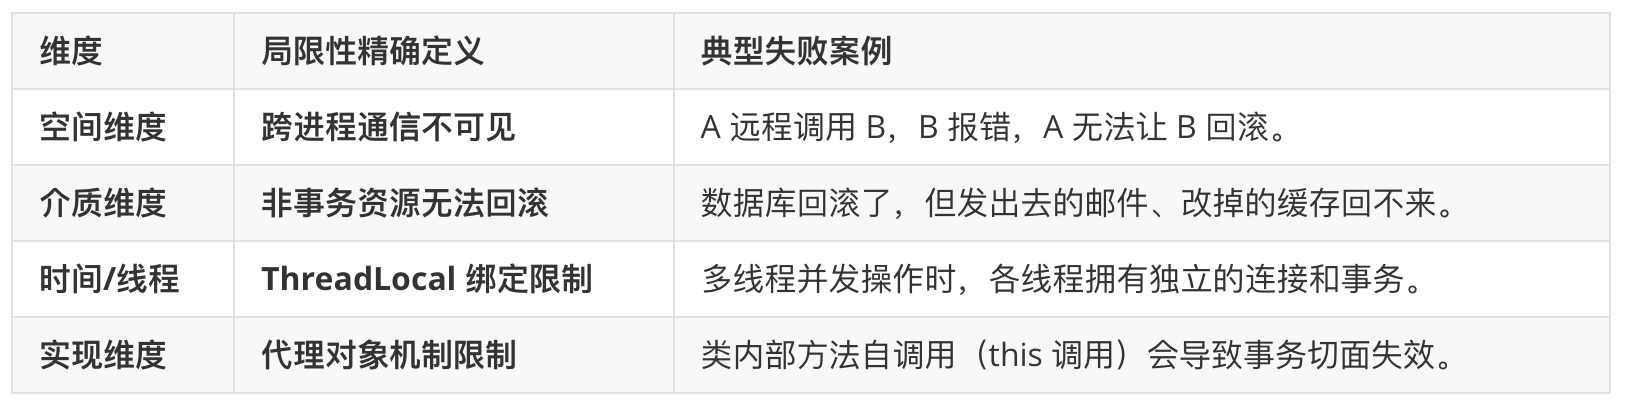
1. 物理边界:无法跨越 “进程” 与 “网络”
本地事务依赖于底层 JDBC Connection。一个事务本质上绑定在一个数据库连接上。在微服务架构中,如果 OrderService(订单业务) 通过 RPC(如 Feign 或 Dubbo)调用 InventoryService(库存业务),@Transactional 只能保证 OrderService 内部数据库操作的回滚,无法控制远程服务的数据库。所以它不能解决分布式事务问题。
2. 资源边界:无法跨越 “异构数据源”
即便是在单体应用中,@Transactional 也有软肋。本地事务默认由 DataSourceTransactionManager 管理,只能管辖同一个数据库连接池中的连接。如果你同时操作 MySQL 和 Oracle,普通的 @Transactional 只能保其中一个。如果你在代码里先发了条 MQ 消息,然后更新 Redis,最后写 MySQL。即便 MySQL 事务回滚了,MQ 消息已经发出了,Redis 里的缓存也已经改了。所以它也无法实现跨物理介质的原子性(除非引入极其厚重的 JTA/XA 二阶段提交协议)。
3. 线程边界:无法跨越 “多线程”
这是最容易忽略的陷阱。Spring 的事务同步机制 TransactionSynchronizationManager 是基于 ThreadLocal 实现的。如果你在 @Transactional 方法内部开启了子线程(如 new Thread() 或 @Async)去执行数据库操作,这些操作将不在父线程的事务控制之下。子线程报错,父线程是不会回滚的;父线程回滚,子线程已提交的操作也无法撤回。
当本地事务搞不定时
当本地事务 @Transactional 搞不定时,通常我们会引入以下方案:
- 分布式事务框架:如
Seata(提供 AT、TCC、Saga 模式)。
- 最终一致性:利用 MQ 事务消息 或 “本地消息表” 实现。
- 编程式补偿:手动写 try-catch,在失败时调用逆向操作(如退款接口)。
本地事务用例演示
本例中,我们使用 spring + mybatis plus + druid + mysql 全注解开发形式进行演示。相关依赖如下:
1
2
3
4
5
6
7
8
9
10
11
12
13
14
15
16
17
18
19
20
21
22
23
24
25
26
27
28
29
30
31
32
33
34
35
36
37
38
39
40
41
42
43
44
45
46
47
| <dependencies>
<dependency>
<groupId>org.springframework</groupId>
<artifactId>spring-context</artifactId>
</dependency>
<dependency>
<groupId>org.springframework</groupId>
<artifactId>spring-jdbc</artifactId>
</dependency>
<dependency>
<groupId>org.springframework</groupId>
<artifactId>spring-tx</artifactId>
</dependency>
<dependency>
<groupId>org.springframework</groupId>
<artifactId>spring-test</artifactId>
<scope>test</scope>
</dependency>
<dependency>
<groupId>org.junit.jupiter</groupId>
<artifactId>junit-jupiter</artifactId>
<scope>test</scope>
</dependency>
<dependency>
<groupId>com.baomidou</groupId>
<artifactId>mybatis-plus</artifactId>
</dependency>
<dependency>
<groupId>org.mybatis</groupId>
<artifactId>mybatis-spring</artifactId>
</dependency>
<dependency>
<groupId>com.alibaba</groupId>
<artifactId>druid</artifactId>
<version>1.2.27</version>
</dependency>
<dependency>
<groupId>com.mysql</groupId>
<artifactId>mysql-connector-j</artifactId>
</dependency>
<dependency>
<groupId>org.projectlombok</groupId>
<artifactId>lombok</artifactId>
<optional>true</optional>
</dependency>
</dependencies>
|
配置类 MyConfig:
1
2
3
4
5
6
7
8
9
10
11
12
13
14
15
16
17
18
19
20
21
22
23
24
25
26
27
28
29
30
31
32
33
34
35
36
37
38
39
40
41
42
43
44
45
46
47
| import com.alibaba.druid.pool.DruidDataSource;
import com.baomidou.mybatisplus.core.MybatisConfiguration;
import com.baomidou.mybatisplus.extension.spring.MybatisSqlSessionFactoryBean;
import org.apache.ibatis.logging.stdout.StdOutImpl;
import org.mybatis.spring.annotation.MapperScan;
import org.springframework.context.annotation.Bean;
import org.springframework.context.annotation.ComponentScan;
import org.springframework.context.annotation.Configuration;
import org.springframework.context.annotation.Primary;
import org.springframework.jdbc.datasource.DataSourceTransactionManager;
import org.springframework.transaction.PlatformTransactionManager;
import org.springframework.transaction.annotation.EnableTransactionManagement;
import javax.sql.DataSource;
@Configuration
@ComponentScan("com.demo")
@EnableTransactionManagement
@MapperScan("com.demo.mapper")
public class MyConfig {
@Bean
@Primary
public DataSource dataSource() {
DruidDataSource dataSource = new DruidDataSource();
dataSource.setDriverClassName("com.mysql.cj.jdbc.Driver");
dataSource.setUrl("jdbc:mysql://xxx:3306/zdemo");
dataSource.setUsername("xxx");
dataSource.setPassword("xxx");
return dataSource;
}
@Bean
public MybatisSqlSessionFactoryBean sqlSessionFactory(DataSource dataSource) {
MybatisSqlSessionFactoryBean factoryBean = new MybatisSqlSessionFactoryBean();
factoryBean.setDataSource(dataSource);
MybatisConfiguration configuration = new MybatisConfiguration();
configuration.setLogImpl(StdOutImpl.class);
factoryBean.setConfiguration(configuration);
return factoryBean;
}
@Bean
public PlatformTransactionManager transactionManager(DataSource dataSource) {
return new DataSourceTransactionManager(dataSource);
}
}
|
业务演示类:
1
2
3
4
5
6
7
8
9
10
11
12
13
14
15
16
17
18
19
20
21
22
23
24
25
26
27
28
29
30
31
32
33
34
35
36
37
38
39
40
41
42
43
44
45
46
47
48
49
50
51
| @Data
@TableName("t_account")
@Alias("Account")
public class Account {
@TableId(type = IdType.AUTO)
private Long id;
private String name;
private BigDecimal balance;
}
@Mapper
public interface AccountMapper extends BaseMapper<Account> {
}
@Service
public class BankService {
@Autowired
private AccountMapper accountMapper;
@Transactional(rollbackFor = Exception.class, isolation = Isolation.REPEATABLE_READ)
public void transfer(Long fromId, Long toId, BigDecimal amount) {
if (amount == null || amount.compareTo(BigDecimal.ZERO) <= 0) {
throw new IllegalArgumentException("转账金额必须大于 0");
}
int result = accountMapper.update(null, new LambdaUpdateWrapper<Account>()
.eq(Account::getId, fromId)
.ge(Account::getBalance, amount)
.setSql("balance = balance - " + amount));
if (result == 0) {
throw new RuntimeException("转账失败:账户不存在或余额不足!");
}
if (amount.compareTo(new BigDecimal("10000")) > 0) {
throw new RuntimeException("金额超过 10000,触发风控回滚!");
}
result = accountMapper.update(null, new LambdaUpdateWrapper<Account>()
.eq(Account::getId, toId)
.setSql("balance = balance + " + amount));
if (result == 0) {
throw new RuntimeException("转账失败:入账账户不存在!");
}
}
}
|
测试单元:
1
2
3
4
5
6
7
8
9
10
11
| @SpringJUnitConfig(classes = MyConfig.class)
public class AccountTest {
@Autowired
private BankService bankService;
@Test
public void test01() {
bankService.transfer(1L, 2L, new BigDecimal(10001));
}
}
|
结果你会发现:在 @Transactional 不加之前,业务执行的过程中如果出现异常,数据库的数据是无法保证一致性的。加上 @Transactional 之后 ,如果中间有异常,数据总会回滚到最初的状态。
事务的传播属性演示
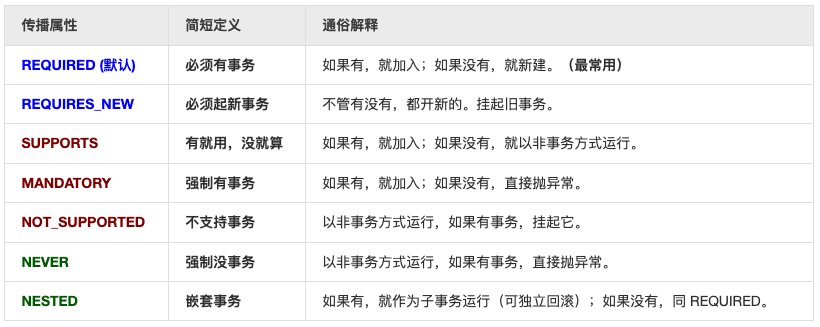
事务的传播属性(Propagation)定义的是:当一个开启了事务的方法被另一个事务方法调用时,这个事务该如何运转。Spring 共有 7 种传播行为:
我们增加一个 LogService,模拟 “无论转账成败,都要记录转账尝试日志” 的场景。
第一步:创建 LogService
1
2
3
4
5
6
7
8
9
10
11
| @Service
public class LogService {
@Autowired
private LogMapper logMapper;
@Transactional(propagation = Propagation.REQUIRES_NEW)
public void saveLog(String content) {
logMapper.insert(new Log(content));
}
}
|
第二步:在 BankService 中调用
1
2
3
4
5
6
7
8
9
10
11
12
13
14
15
16
17
18
19
20
21
22
23
24
| @Service
public class BankService {
@Autowired
private AccountMapper accountMapper;
@Autowired
private LogService logService;
@Transactional(propagation = Propagation.REQUIRED)
public void transfer(Long fromId, Long toId, BigDecimal amount) {
logService.saveLog("尝试转账 " + amount);
accountMapper.update(null, new LambdaUpdateWrapper<Account>()
.eq(Account::getId, fromId)
.setSql("balance = balance - " + amount));
if (true) throw new RuntimeException("转账中途崩溃!");
}
}
|
测试并验证结果:
测试场景 A:验证 REQUIRED (默认)
- 设置:将 LogService.saveLog 的传播属性设为 REQUIRED。
- 现象:transfer 报错后,account 表余额没变,log 表也没有新记录。
- 结论:saveLog 加入了 transfer 的事务,一损俱损。
测试场景 B:验证 REQUIRES_NEW
- 设置:将 LogService.saveLog 的传播属性设为 REQUIRES_NEW。
- 现象:transfer 报错后,account 表余额没变(回滚了),但 log 表新增了一条记录。
- 结论:saveLog 开启了一个独立的新事务,transfer 的回滚不会影响到它。
测试场景 C:验证 NESTED (嵌套事务)
- 设置:将 LogService.saveLog 设为 NESTED,并在 BankService 里用 try-catch 包裹 logService.saveLog。
- 现象:如果 saveLog 内部报错,它可以被 catch 住,转账继续成功。但如果 transfer 报错,saveLog 也会被连带回滚。
- 结论:子事务可以独立回滚,但必须受父事务的总体控制。
如果你把 saveLog 方法写在 BankService 类内部,然后直接调用 this.saveLog(),那么传播属性会完全失效!
- 原因:Spring 的事务是通过
AOP 代理对象实现的。当你调用 this.saveLog() 时,是直接对象内部调用,没有经过代理对象,事务增强逻辑(拦截器)根本没起作用。
- 解决方法:
- 像上面的例子一样,分拆到两个不同的 Service 类中。
- 或者在同一个类中,通过 AopContext 获取当前的代理对象进行调用。
1
2
3
4
5
6
7
8
9
10
11
12
13
14
15
16
17
18
19
20
21
22
23
24
25
26
27
28
29
30
31
32
33
34
35
36
37
|
@Configuration
@EnableTransactionManagement
@EnableAspectJAutoProxy(exposeProxy = true)
public class AppConfig {
}
@Service
public class BankService {
@Autowired
private AccountMapper accountMapper;
@Transactional(propagation = Propagation.REQUIRED)
public void transfer(Long fromId, Long toId, BigDecimal amount) {
BankService proxy = (BankService) AopContext.currentProxy();
proxy.saveLog("尝试转账操作");
accountMapper.update(...);
if (amount.compareTo(new BigDecimal("1000")) > 0) {
throw new RuntimeException("转账失败,触发回滚");
}
}
@Transactional(propagation = Propagation.REQUIRES_NEW)
public void saveLog(String msg) {
System.out.println("正在独立事务中记录日志: " + msg);
}
}
|